WORKFLOW from camera to the world

I’ve received several inquires recently from people frustrated with coming up with a workflow to get their images from camera > computer > edited > exported > shared.

Any workflow has to have three goals: Do it QUICKLY, do it RIGHT, QUALITY results. The best way to achieve all three is to (a) know your workflow and (b) have as much of the “busy work” set up prior to the shoot or game.  Have your import template, metadata, folder system, export template, and graphic templates already set up before you even leave the house.

Quick note about Lightroom… some people use Lightroom as their library in that they keep hundreds of thousands of images on their computer and accessible through Lightroom. I am not one of those people. I simply use Lightroom as an import/editor/export workflow and once the project is complete, I remove images from Lightroom and burn a permanent archive on a Blu-ray Disc as well as have a cloud backup with SmugMug.

TEMP folder for each session/match.

TEMP folder for each session/match.

In my Photos folder on my MacBook Pro, I have a TEMP folder with a series of folders within it. For each shoot, I duplicate the TEMP folder and rename it with the date and event (20200710 ____). The folder inside called “Rename Me” is given the same name as the event folder but with a space before the date so that it moves to the top of the folder.

For the majority of work I do, depending on how you view these, there are three or four different scenarios:

  1. PROFESSIONAL - Working a game with support crew in the press box: editor, social media managers, etc.  This would be how I work for a Nashville SC match.

  2. HIGH SCHOOL GAME - Working a game with no support crew where I work multiple roles: photographer > editor > social media.  This would be how I work for Christ Presbyterian Academy.

  3. MEDIA DAY - I almost always shoot tethered in these situations

  4. LOCATION SHOOT - Not shooting tethered and no immediate deadline, import images that evening at home

I’m going to run my workflow for a Nashville match - #1 above - and then include a variation if you do not use Photo Mechanic - #4 above.

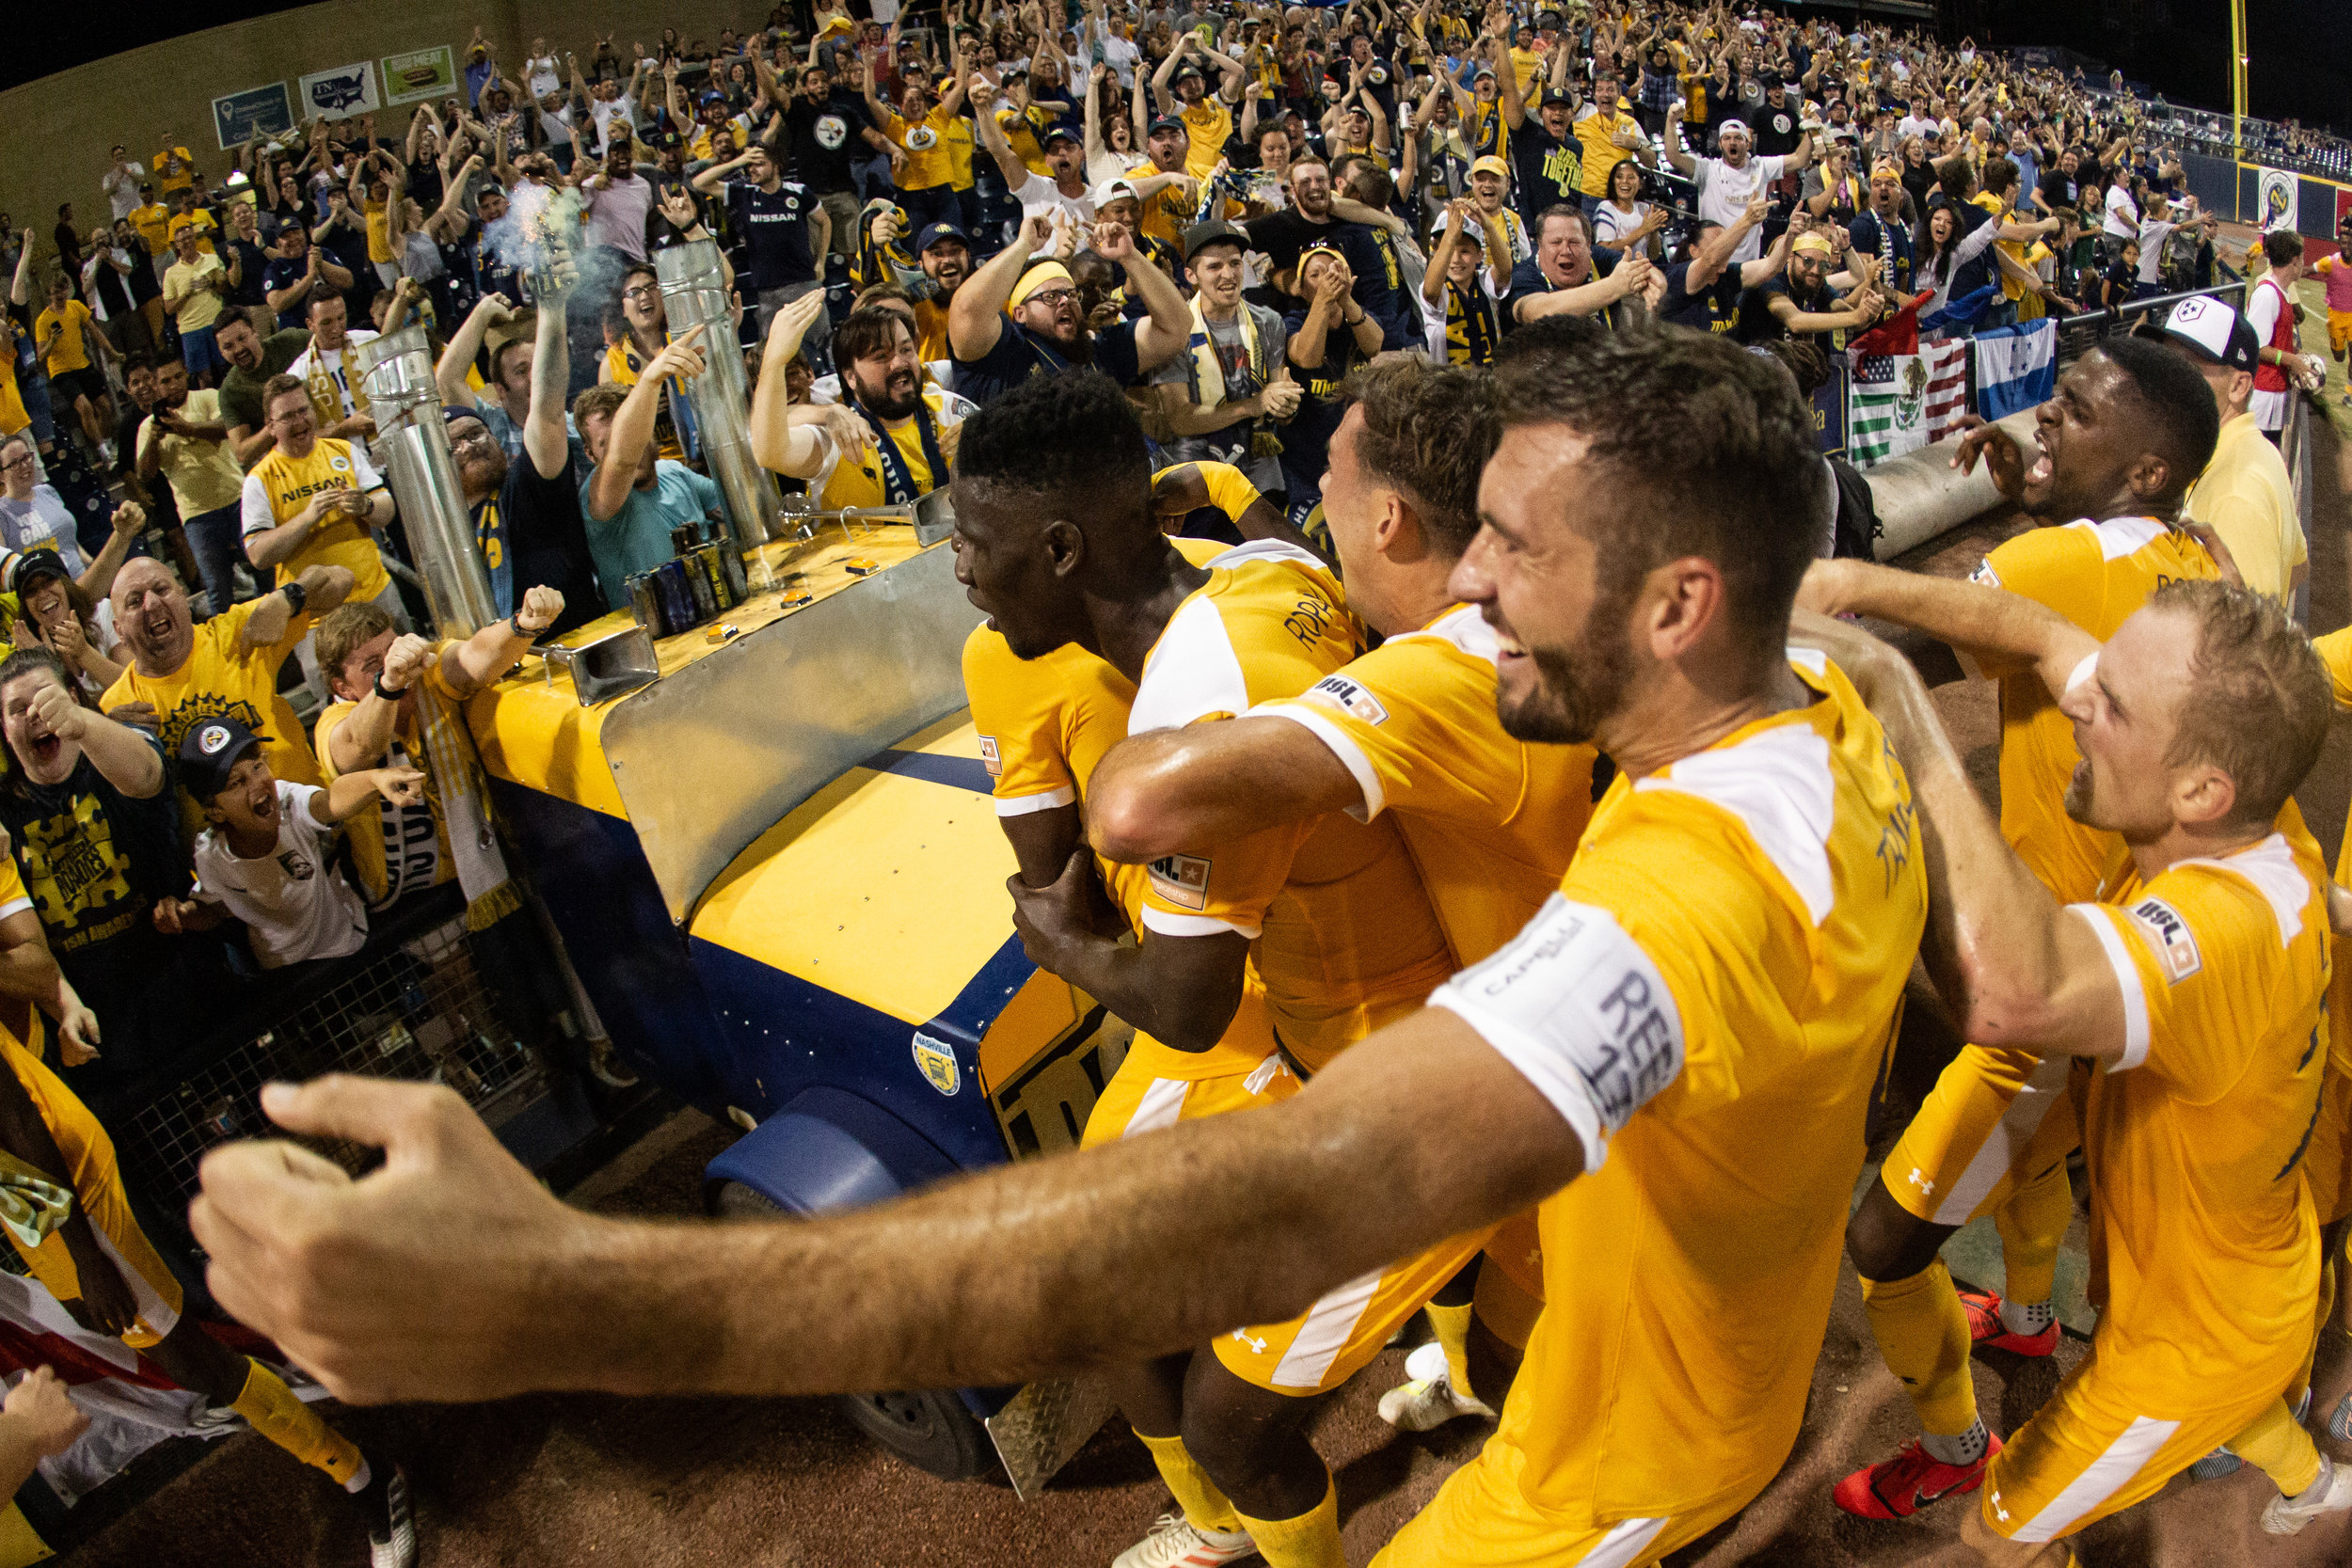
Working a big game is just fun.  It’s fantastic to have a great content team to work with where everyone plays a different role and having a big crowd in a big venue makes everything even better!  I’m on the field along with the lead team photographer (Sierra), and usually a third shooter.  Upstairs in the press box is the content team which selects images, edits them, imports them into graphics and puts them out on the various social media channels.

If you’re a sports or wedding photographer, you need to get Photo Mechanic. Even if making selects is the only time you will ever use it, Photo Mechanic speed up your workflow considerably as the screen redraws are instant. Well worth $150.

To get the images from my camera to them, in 2019, I sent them to my phone and uploaded to a SmugMug link to which everyone upstairs has access.  While we only played one home match before things were shut down, the plan was to get both of us hotspots and FTP images directly from the camera to a PicDrop picdrop.de link.  SmugMug is great but still does not have FTP capabilities.

It’s important to send the RAW file to one card and the JPEG to another and transmit the full res JPEG (6000x4000) to the server rather than the small embedded JPEG in the Sony a9/a9ii RAW file

During the game, each of us will usually send 50+ images out so content team has everything they need to tell the story of the night.  We try to get images of every player on the evening as our SmugMug server is set up to populate each of the players links by using keywords so players will have images to post at the conclusion of each match.

After the game, I will import the RAW images into Photo Mechanic and make selections for the final images which will be uploaded to the team server as a permeant archive and later use.

WORKFLOW:

  • Import RAW images into Photo Mechanic (PM) and apply metadata template

  • Make selections in PM

  • Import those sections into Lightroom for cropping and a quick color and exposure correction. The Lightroom import is where I rename the images. The naming structure I use is YYYYMMDD Opponent/Event.  You always want the year first followed by the month and the date last so everything will show up in chronological order.

Lightroom importing from Photo Mechanic

Lightroom importing from Photo Mechanic

LIGHTROOM IMPORTING:

  • Use the MOVE feature on the import from PM

  • At the bottom, SORT: Capture Time **if you are using more than one camera, it is VERY important to make sure the internal clocks are synchronized. Make checking this part of your pregame routine.

  • FILE RENAMING: Check “Rename Files,” Template: Custom Name-Sequence (Custom Text, Sequence #1 [1] ), Custom Text: input your file name and the “sample” below will change accordingly

  • APPLY DURING IMPORT: Have an import template, which is set up to not overwrite any of the metadata which PM has embedded into the images

  • DESTINATION: Do not check “Into Subfolder,” Organize: Into one folder

LIGHTROOM EXPORTING

  • EXPORT LOCATION: Export To: choose folder later, Existing Files: Ask what to do

  • FILE NAMING: Rename To: Filename, Extensions: Lowercase

  • FILE SETTINGS: JPEG, sREG (Adobe RGB 1998 is also fine), Limit File Size To: 8000 K

  • IMAGE SIZING: Resolution 300 ppi

Lightroom export window with several different export presets in the left column.

Lightroom export window with several different export presets in the left column.

WORKFLOW (without Photo Mechanic)

For those of you who do not use Photo Mechanic, here is a workflow for using Lightroom only.

  • Drag and drop your images on to your hard drive

  • Import them into Lightroom using ADD (not MOVE)

  • Make your selections using the star ratings

  • Filter in the lower RH corner: Rated only

  • Library module and view as grid (G)

  • Select all (Cmd-A)

  • Rename Photos (under Library menu bar)

  • Custom Name - Sequence

  • Go to Finder and drag and drop those renamed files into a different folder

  • To back to Lightroom and click on the question mark on the first file and locate the missing file. Lightroom will then move all of the other images into the new folder and you can delete the original RAW folder from Lightroom

There are “right” and “wrong” ways of doing thing but as with any creative workflow, some of it is going to be based on how you work and what you need. I hope this is helpful in getting you to a good starting point and from there, you can figure out what works best for you and your work.

JFW

Workflow II - Technical

Here’s part II of the workflow:

IMG_1903.jpg

CAMERA SETTINGS

Send the RAW file to the fast card slot (Slot 1) and the JPEG to the slow slot (Slot 2). When you lock the image, you will be locking the JPEG in Slot 2 as well as viewing playback of the JPEG.

• RED 1/13 -

  • File Format RAW & JPEG

  • JPEG Quality Fine

  • JPEG Image Size L:24M

• RED 3/13 - Select Media Slot 2

• YELLOW 6/7 - Rec Media Settings

  • Prioritize Rec Media Slot 2

  • Recording Mode Sort (JPEG / RAW) - Slot 1: RAW. Slot 2: JPEG

• PURPLE 9/11 - Custom Key Playback, C3 assigned to Protect

• PURPLE 9/11 - Custom Key Playback, Fn assigned to Send to Smartphone

• BLUE 3/3 - Image Jump Setting: Front Dial, Protect Only. This is key as it lets you scroll through only the locked images when selecting multiple images to send vs having to find them amongst everything.

• Another key point in this is why shooting RAW to one card and JPEG to another card… with the Sony a9, the embedded JPEG in the RAW file is very small 1600x1080 which is a 2Mp image. The proper JPEG is a 6000x4000 24Mp image. The smaller image is just not going to cut it even for social media if there is any cropping because it’s so small to start with.

CAMERA SENDING

• Select an image you want to send.

• Hit the Fn button

• Select either THIS IMAGE or MULTIPLE IMAGES

If MULTIPLE IMAGES, use the front wheel to scroll through locked images or the back wheel to scroll through all images. To select, press the button inside the wheel

• Press MENU to send your selections

iPHONE RECEIVING

• Wi-Fi must be on

• Sony Imaging Edge App Settings

- Copy Image Size: Original

- Connect w/camera via access point: OFF

SMUGMUG

We have a permanent hidden link we use for the entire season to upload images during a game which is cleaned out each time before the next match. I can upload either within the SmugMug app or by using a link in an iPhone browser. The later works great for a free-lance photographer uploading which lets them upload directly without having to setup any sort of custom login for them.

In that gallery be sure to set the sorting order to SORT BY DATE UPLOADED, 9-1. This way, the newest images will always appear at the top of the gallery for the creative team working in the press box.

PREPARE

Before I leave the house, I set all the information in Photo Mechanic as well as log into the USL Photoshelter server which is the league method for uploading.

Screen Shot 2019-09-01 at 1.18.59 AM.png

Additionally, I also have a TEMP folder which I use for each game with a series of several empty folders: RENAME ME (for selects), JPEG, RAW, RAW for HT-FT (halftime JPEG imports), Tw2k (for social media exports), USL1 HT, USL2 FT. In Lightroom, I have presets for Halftime and Full-time which automatically renames images with the naming method the league requires.

When importing the cards to my MBPro, in Photo Mechanic I select Import Locked JPEGs only and I send them to the RAW for HT-FT folder as mentioned above. Once they are in PM, I make the selections and then open them in Lightroom to make quick crops and correct exposure and white balance if necessary. In Lr, I select ADD rather than COPY or MOVE and the league exports go to the USL1 HT folder. From there, I upload them to their Photoshelter server.

HALFTIME IS (NO LONGER) STRESSFUL!

Once halftime hits, I set an alarm on my phone for 11 minutes as halftime is 15 minutes and it takes about a minute in and out each way. Our content team already has the images Sierra and I have sent during the first half, but I need to send 10-15 images to the league during the break.

For the first few games in our 2018 inaugural USL season, this was a VERY stressful time for me because it felt like I was trying to cram an hours worth of work into 10 minutes. Once I got the workflow down a few games into the season last year, I get finished in under the allotted time and the alarm doesn't sound until well after I’m back out on the field.

MAKE IT WORK FOR ME

While I understand most people shooting sports don’t work for a professional team in a top tier league like the USL Championship or Major League Soccer, the same principles we use at Nashville Soccer Club can be just as easily applied to sports at the college or even high school level.

If you’re shooting for your son or daughters high school team, get with the coach or athletic director prior to the start of the season have them set up social media accounts for the team and/or athletic department and see if there is a student manager who could help out in posting images and updates.

Sony A9 (firmware v/5)

Sony A9 with grip E.jpg

I should have have this post 3 months ago when this (awesome) new firmware was released.

There are several great new features and the kerning on the menu font is slightly more condensed which makes everything easier to read, but the main thing is the new focus tracking which is world class.

Here we go…

NOTE: Updated for Sony a9ii (v2)

CAMERA 1 (RED CAMERA)

v5 1 Camera 1.jpg

1/14   QUALITY / IMAGE SIZE 1

  • File Format RAW & JPEG

RAW and JPEG - I shoot both at sporting events as I need to be able to transmit JPEG images to the social media managers throughout the course of the game and the embedded JPEG in the RAW file is too small.

  • RAW File Type Compressed

  • JPEG Quality Fine

  • Image Size L: 24M

  • Aspect Ratio 3:2

  • APC-C / Super 35mm Off

2/14   QUALITY / IMAGE SIZE 2

  • High ISO NR Normal

  • Color Space sRGB

  • Lens Comp Auto, Auto, Off

3/14   SHOOT MODE / DRIVE

  • Self-timer Type Self-timer (Single) - 10 seconds

  • Bracket Settings Cont. Bracket, Off, ->0>+

  • 1/2 Recall n/a, only for 1, 2, or 3 on the mode dial

  • 1/2 Memory n/a

  • Select Media Slot 1 (a9ii), Slot 2 (a9)

The slot you select here is what you will send to your SmartPhone as well as what card slot will lock images.

5/14   AF 1

  • Priority Set in AF-S AF

  • Priority Set in AF-C Balanced Emphasis

  • Focus Area Tracking: Flexible Spot S

  • Focus Area Limit Uncheck anything you don’t want to use

  • Swt. V/H AF Area AF Point Only

6/14   AF 2

  • AF Illuminator Off

  • Face/Eye AF Set On, Human, Auto, On, On

  • AF Track Sens Typically 3 or 4

  • Aperture Drive in AF Standard

  • AF w/shutter Off

This is Sony-speak for back button focusing.  If you back button focus, turn this off, if you don’t leave it on.  If you’re not sure what BBF is, you’re putting the action of grabbing focus and opening the shutter on two different controls.  Almost all of the proper photogs I know do this, but I do know a few who don’t so this is going to be a personal preference.

  • Pre-AF Off

7/14   AF 3

  • AF Area Registration Off

  • Focus Frame Color White

  • AF Area Auto Clear Off

  • Disp cont AF area On

8/14   AF 4

  • Phase Detect Arts Off

  • Circ of Focus Point Does Not Circulate

  • AF Micro Adj

9/14   EXPOSURE 1

  • Reset EV Comp Reset

  • ISO Setting (Range Limit) Depends on the venue, but usually 50-12,800

  • Metering Mode usually Multi

  • Face Priority in Multi On

  • Spot Metering Point Focus Point Link

10/14   EXPOSURE 2

  • Exposure step 0.3 EV

  • AEL w/shutter Off

  • Exposure Std Adjust leave this alone unless you know what it is

11/14   FLASH

  • Flash Mode Flash Off

  • Flash Comp 0.0

  • Exp comp set Ambient & Flash

  • Wireless Flash On

  • Red Eye Reduction Off

12/14   COLOR / WB / IMG PROCESSING

  • White Balance Usually Auto, but varies, check out underwater!

  • Priority Set in AWB Standard

  • DRO / Audo HDR Off

  • Creative Style Standard

  • Picture Effect Off, n/a in RAW

  • Shutter AWB Loct Cont. Shooting

13/14   FOCUS ASSIST

  • Focus Magnifier Time No Limit

  • Initial Focus Mag x4.7

  • AF in Focus Mag On

  • MF Assist Off, but this is interesting…

If you throw the switch on your lens into MF (manual focus), as soon as you twist the focus ring, it zooms in to assist in grabbing focus.  More of a video thing, but really great as I don’t know of any Canon or Nikon cameras which do this.

  • Peaking Level Off

14/14   SHOOTING ASSIST

  • Anti-Flicker Shoot Off (unless you need it)

CAMERA 2 (PURPLE CAMERA)

v5 2 Camera 2.jpg

1/11   MOVIE 1

  • File Format XAVC S HD / 4k or HD

  • Record Setting 24p 50 or 60p 50 (HD), 24p 60 or 24p 100 (4k)

  - in 4k you have 24p or 30p (and 30 should NEVER be an option!)

  - in HD you have 24p, 30p, 60p, and 120p (30 fps also sucks in HD)

  • S&Q Settings 24, 120 fps

  • Proxy Recording Off

2/11   MOVIE 2

  • AF Drive Speed Normal

  • AF Track Sens Standard (responsive can be too jumpy)

  • Auto Slow Shut On

  • Initial Focus Mag x1.0

  • Audio Recording On

3/11   MOVIE 3

  • Audio Level Display On

  • Audio Out Timing Live

  • Wind Noise Reduct Off

  • Marker Display Off

  • Marker Settings Off

  • Video Light Mode Power Link

4/11   MOVIE 4

  • Movie w/ shutter Off

5/11   SHUTTER / STEADY SHOT

  • Shutter Type Mechanical / Electronic

Mechanical for using strobes

Electronic for everything else - you’ll need to be in this to get the 20 fps

  • e-Front Curtain Shut On

  • Release w/o Lens Disable

  • Release w/o Card Disable

This should NEVER be turned on!!!  Never, ever, never!  Leave this on and at some point, you’re going to shoot a game or a session only to discover you have zero images. Then you’ll get sacked.  DISABLE this now!

  • SteadyShot On

  • SteadyShot Settings Auto

6/11   ZOOM

7/11   DISPLAY / AUTO REVIEW 1

  • DISP Button Lots of option here for both the MONITOR and FINDER

MONITOR  -  No Disp Info, Histogram, Level, For Viewfinder

FINDER  -  No Disp Info, Histogram, Level

  • FINDER / MONITOR Auto (usually)

This is really great until you get into a dark room at which time the lack of light makes the camera believe you are looking through the viewfinder and thus blocking the light sensor which determines whether to use the viewfinder or monitor.  I have C1 set to toggle this when necessary.

  • Finder Frame Rate High

  • Zebra Off

  • Grid Line Off

  • Exposure Set Guide Off

8/11   DISPLAY / AUTO REVIEW 2

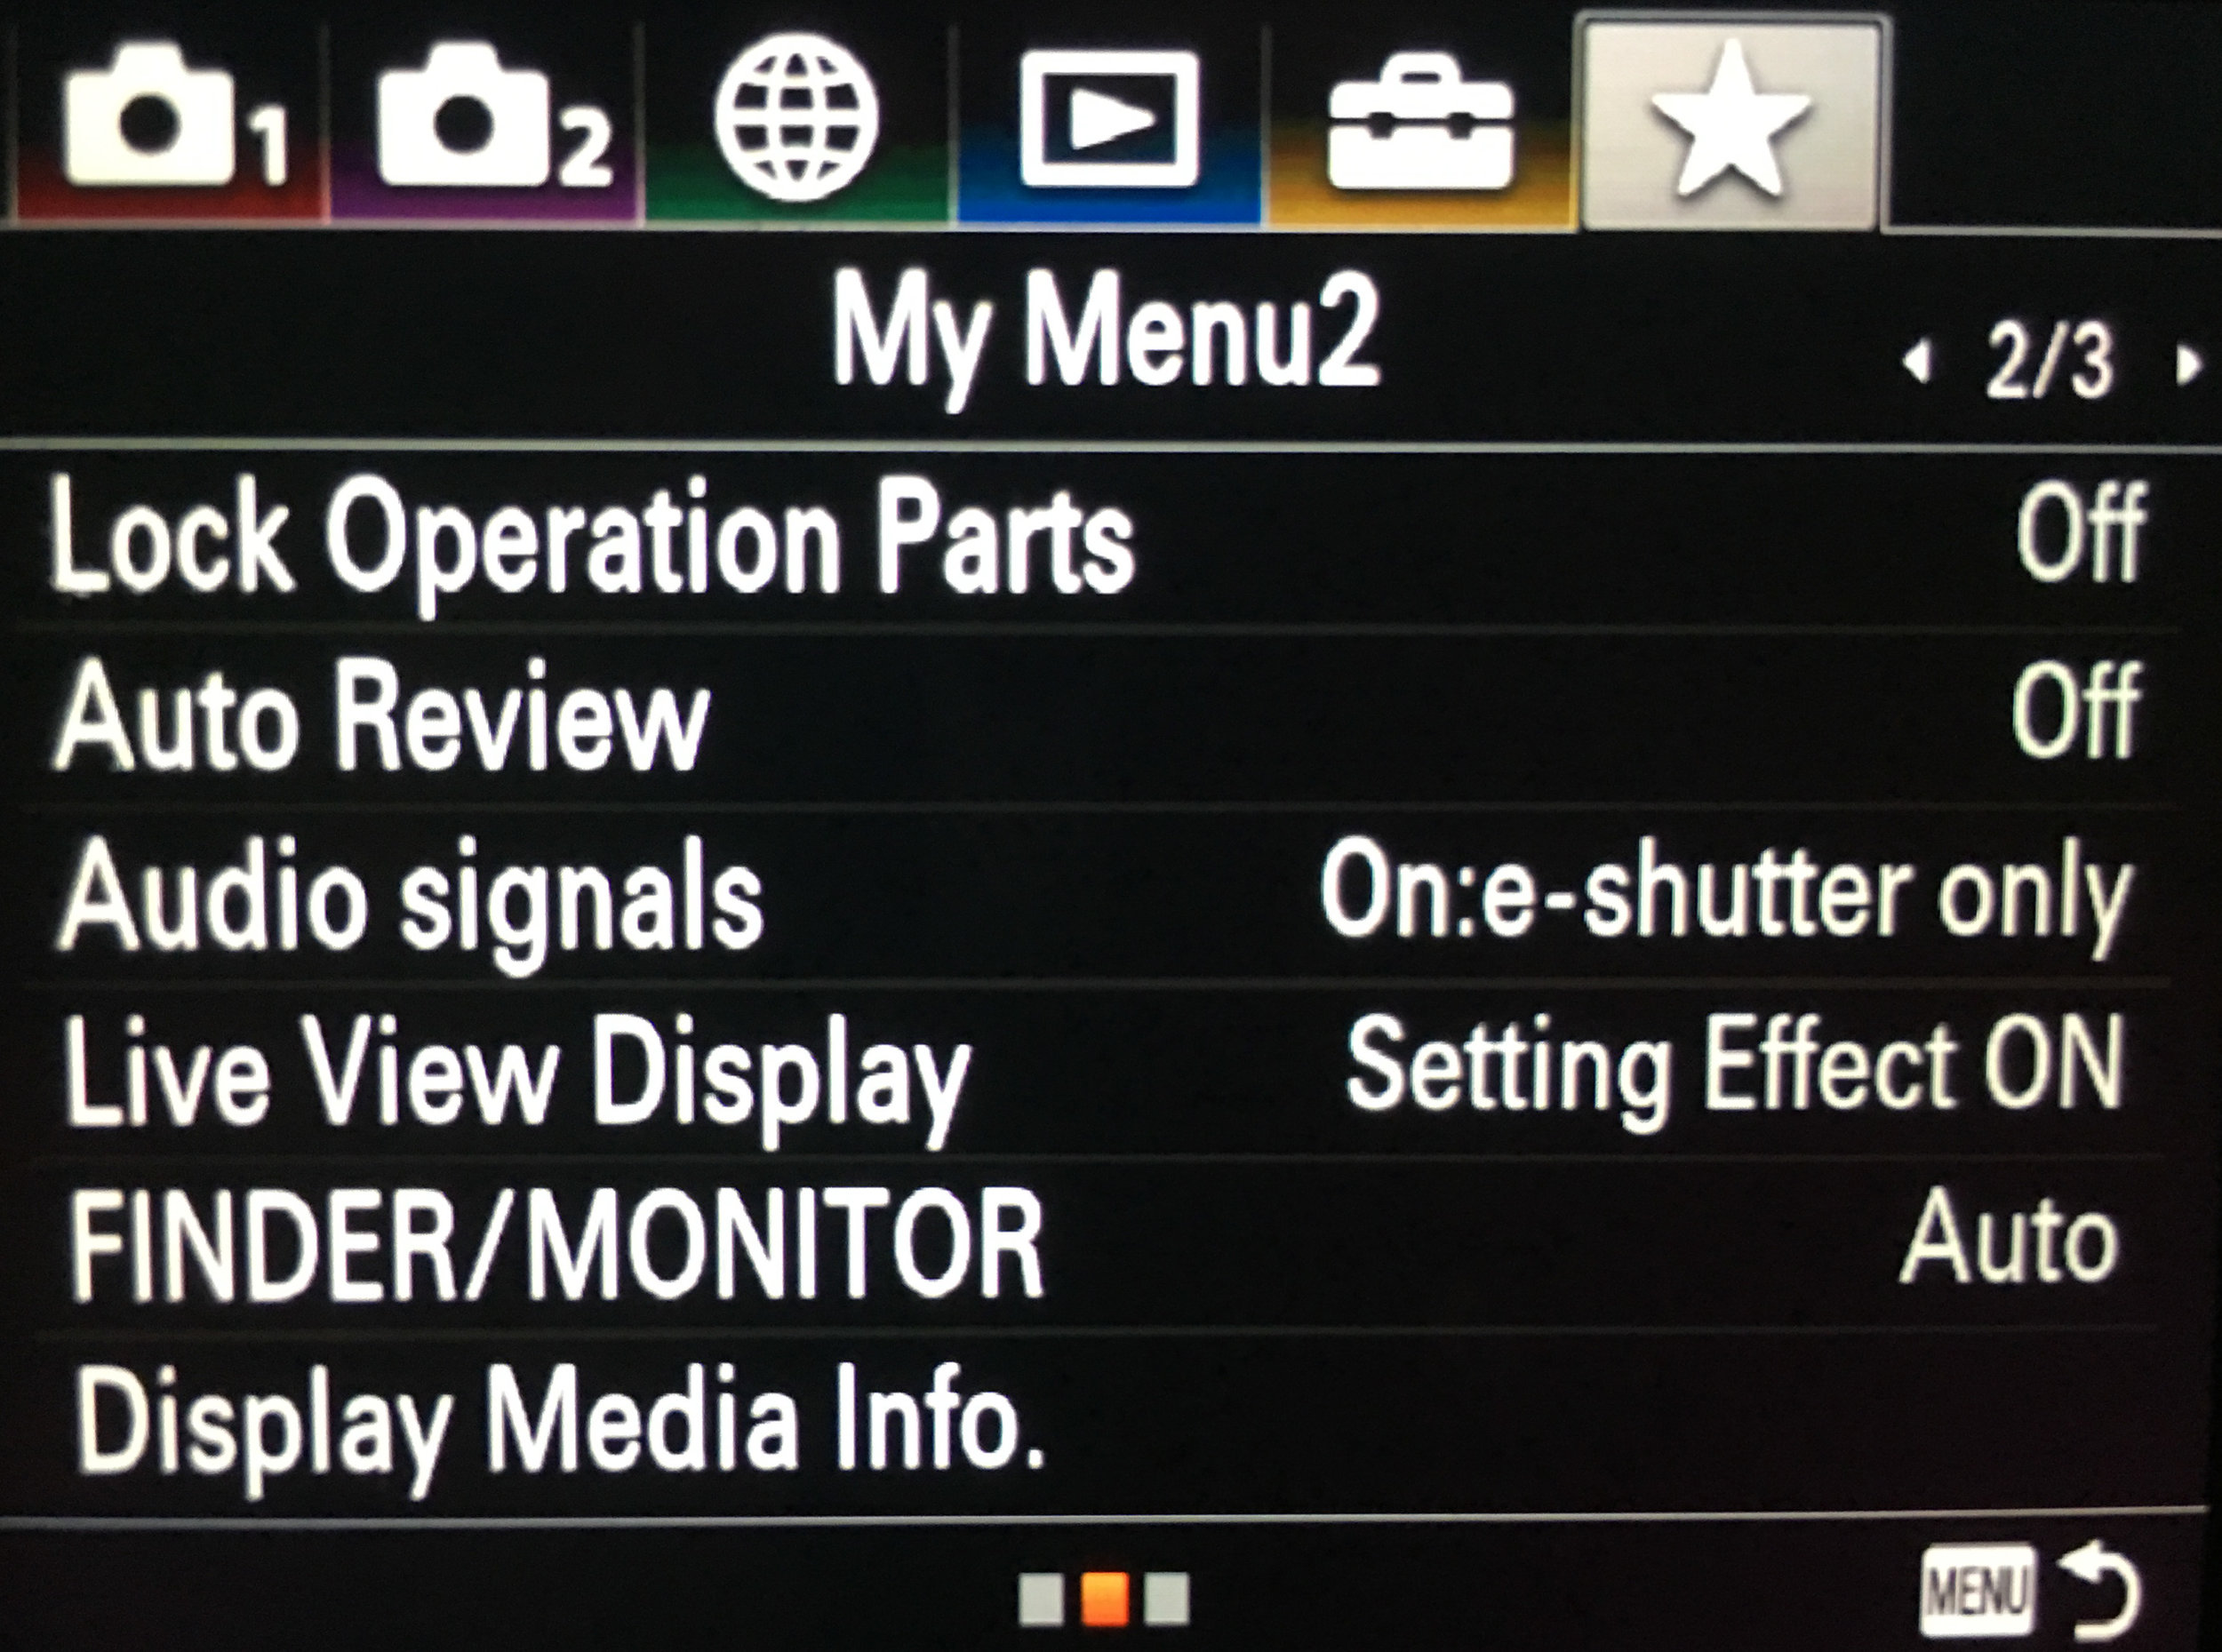
  • Live View Display Setting Effect ON (Off for strobes)

  • Shoot Start Disp Off

  • Shoot Timing Disp On: Type 4

  • Cont Shoot Length Always Displayed

  • Auto Review Off

9/11   CUSTOM OPERATION 1

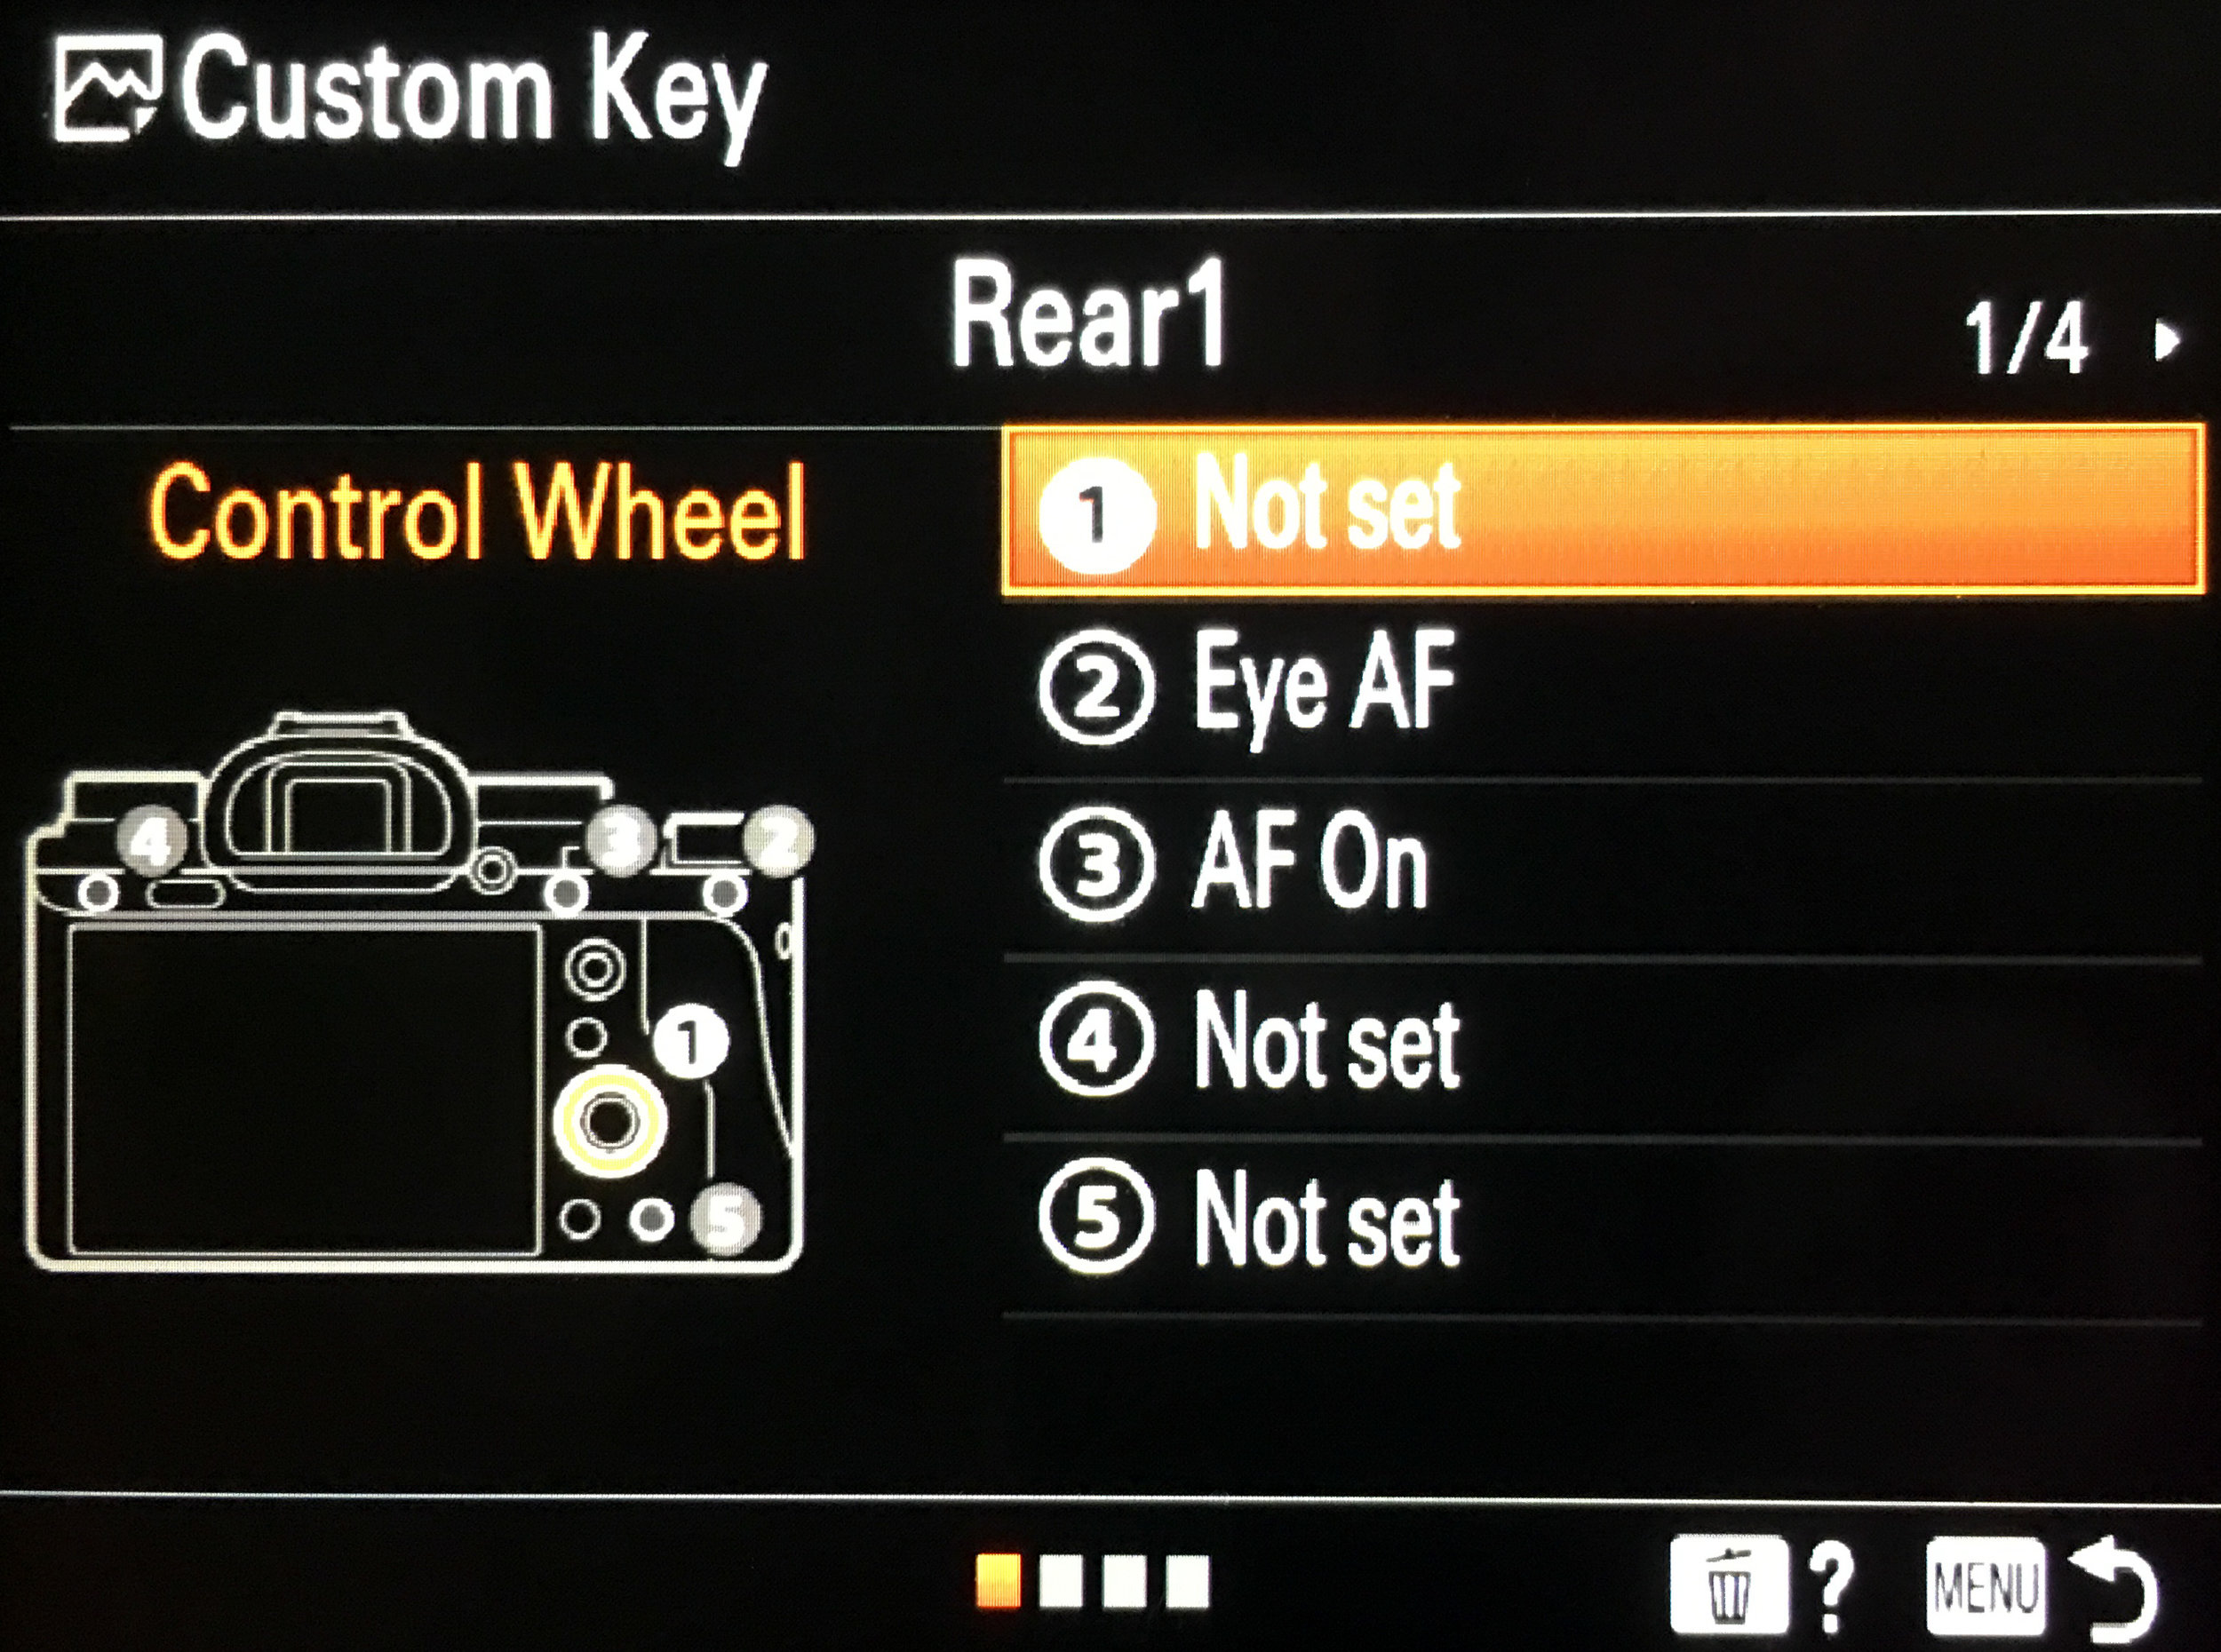
  • PICTURE Custom Key

Rear 1

1 Control Wheel Not set

2 AFL Button Eye AF

3 AF-ON Button AF On

4 C3 Not set

5 C4 Not set

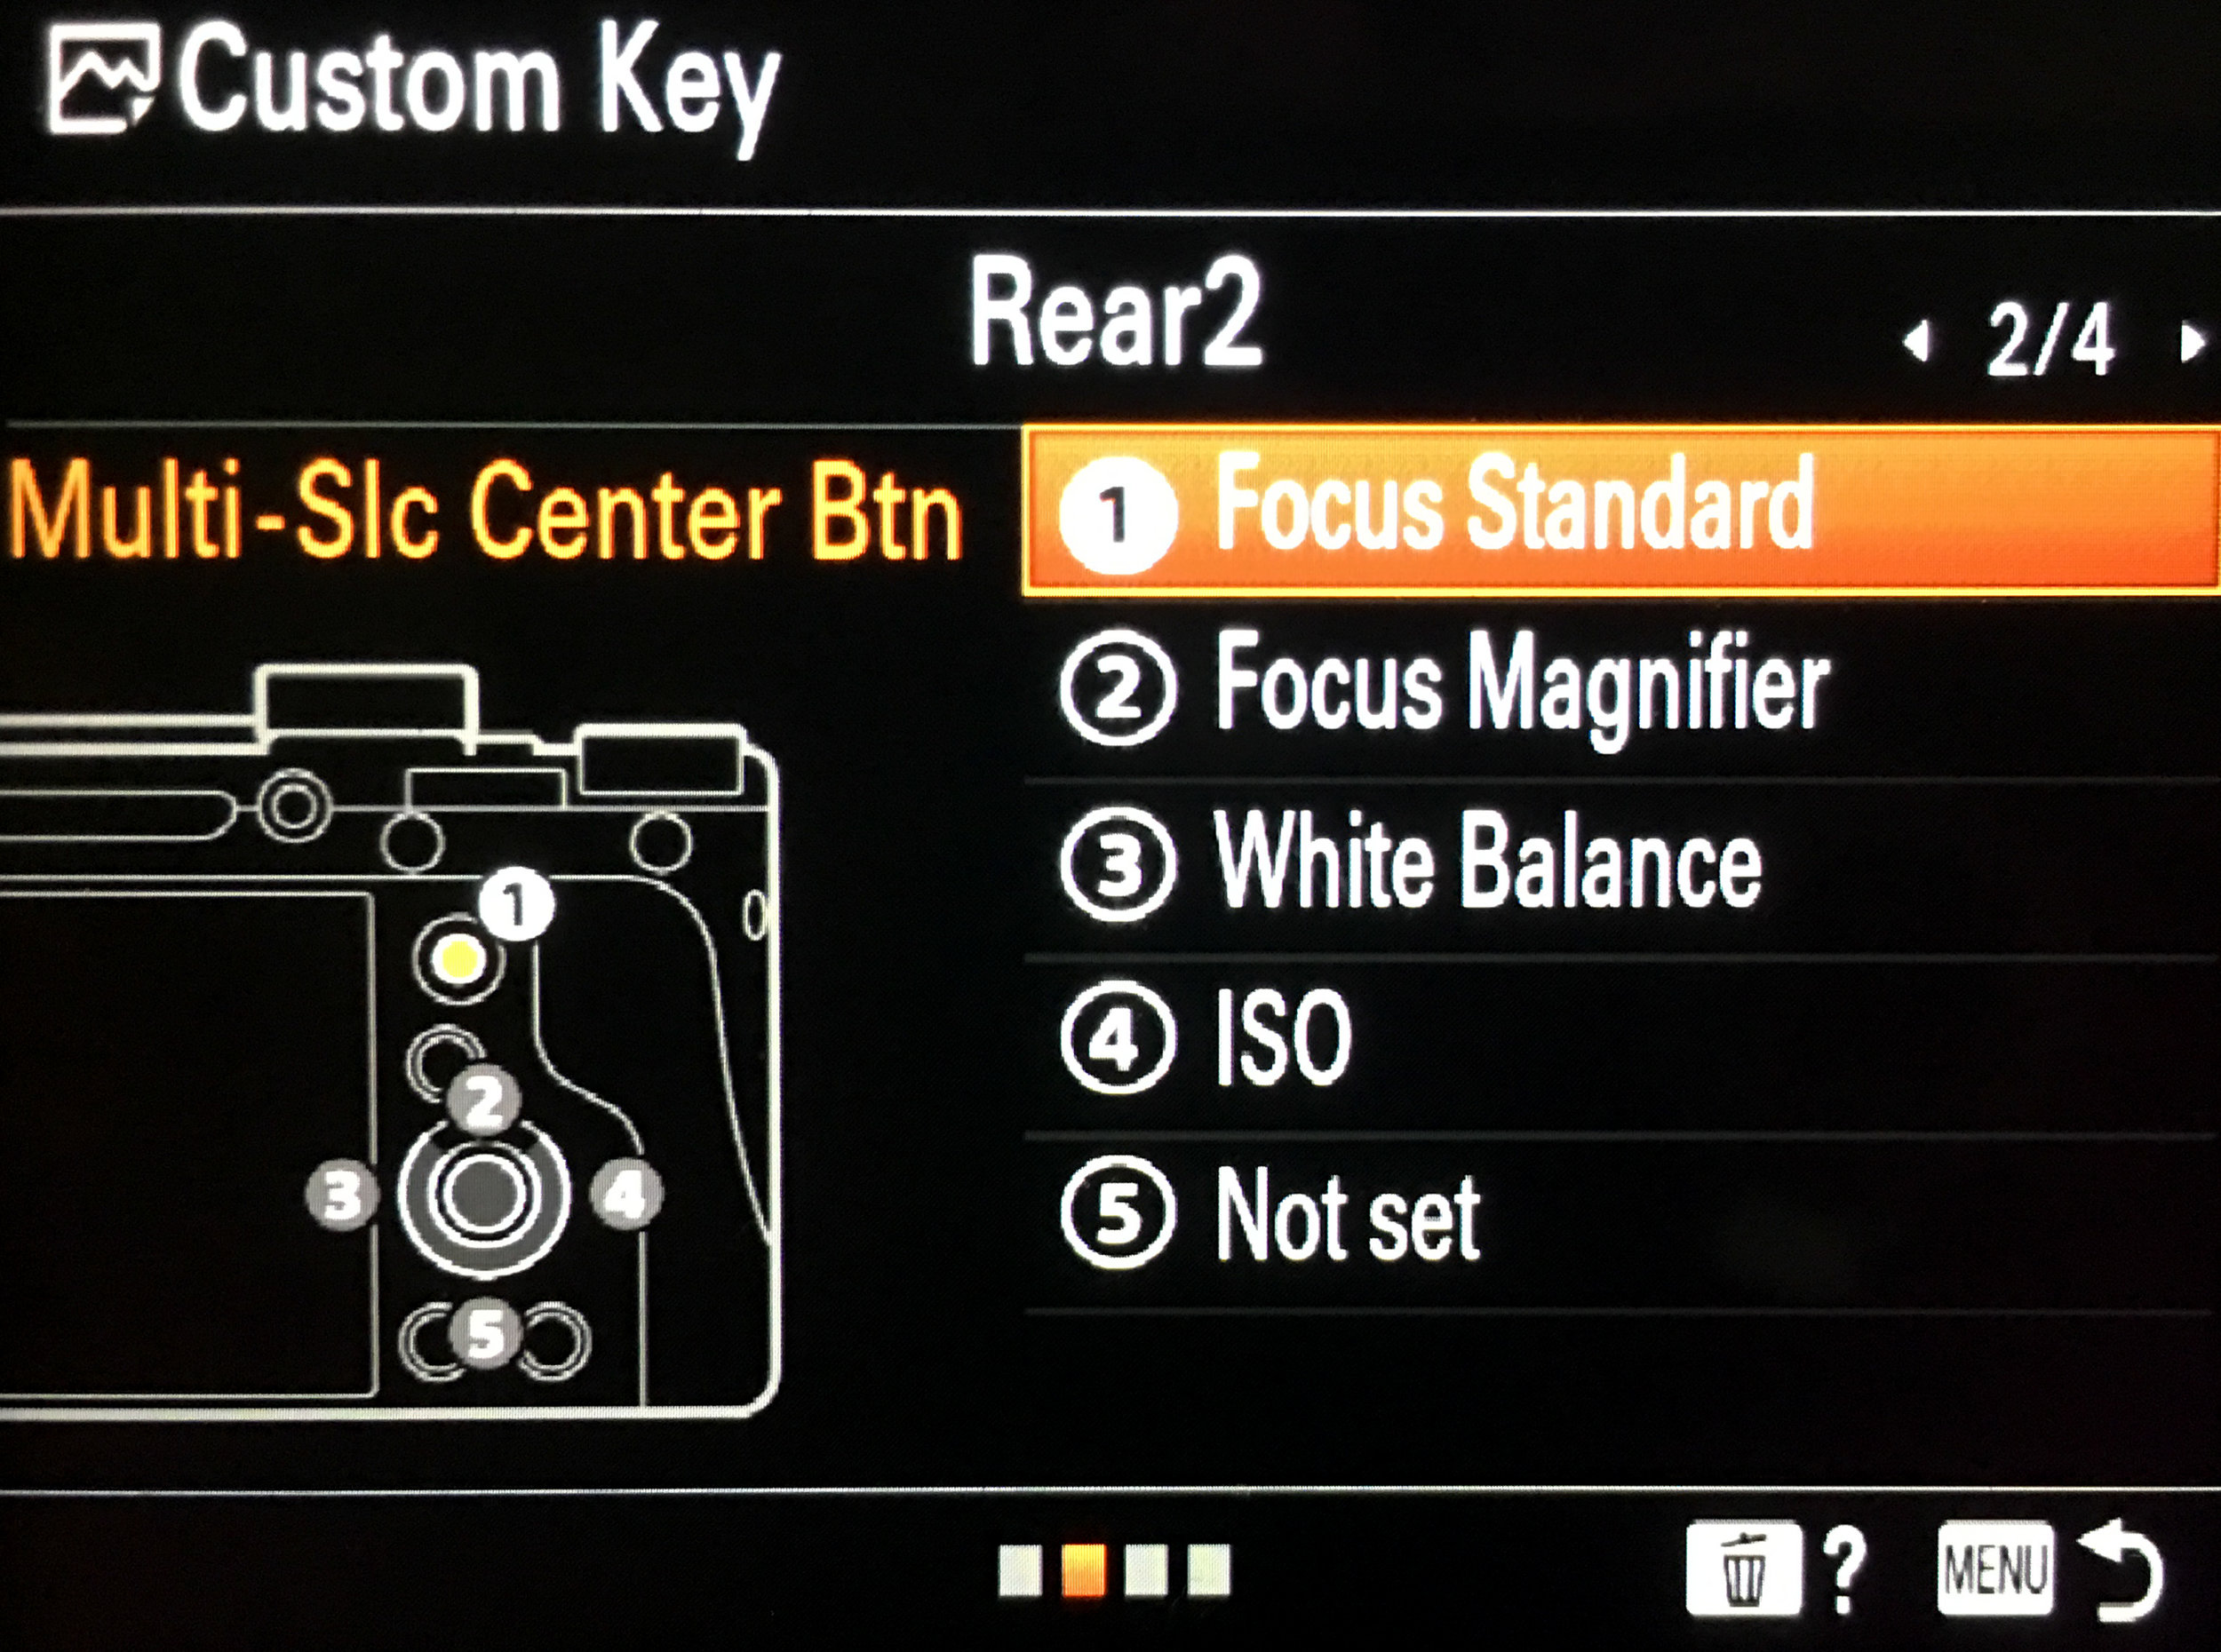
Rear 2

1 Multi-Slc Center Btn Focus Standard

2 Center Button Focus Magnifier (only works in AF-S mode)

3 Left Button White Balance

4 Right Button ISO

5 Down Button Not Set

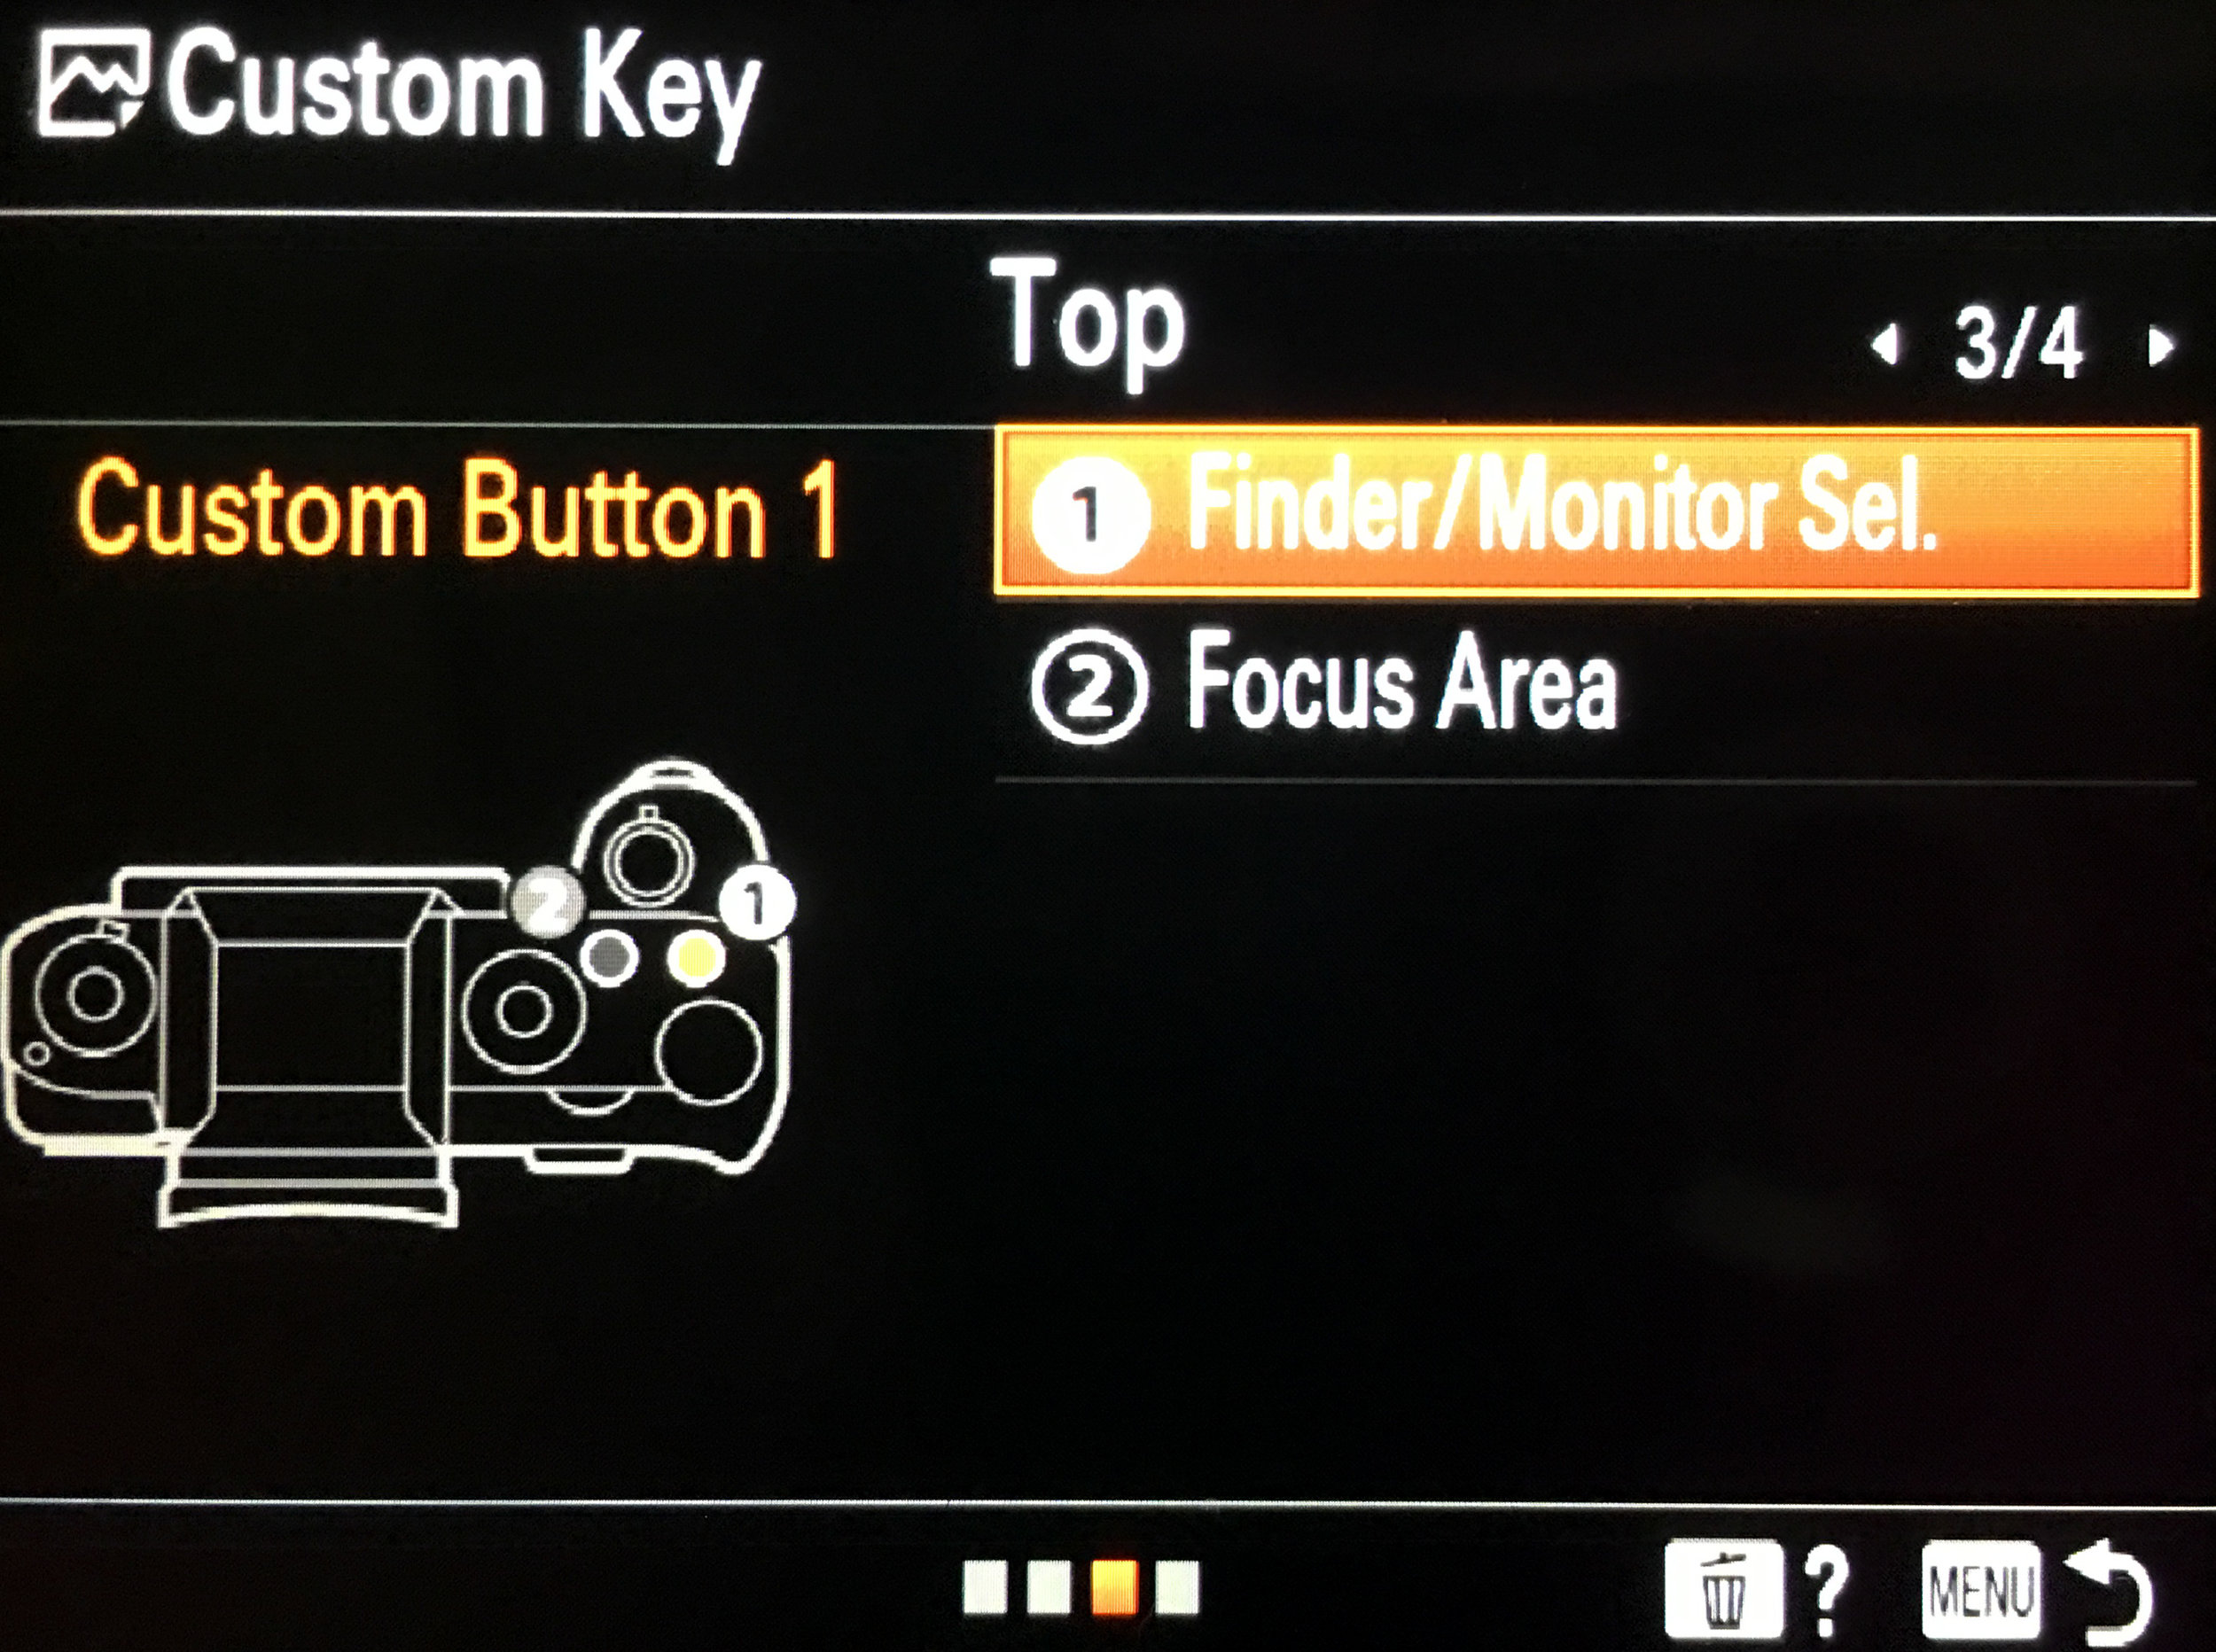
Top

1 C2 Finder/Monitor Sel

2 C2 Focus Area

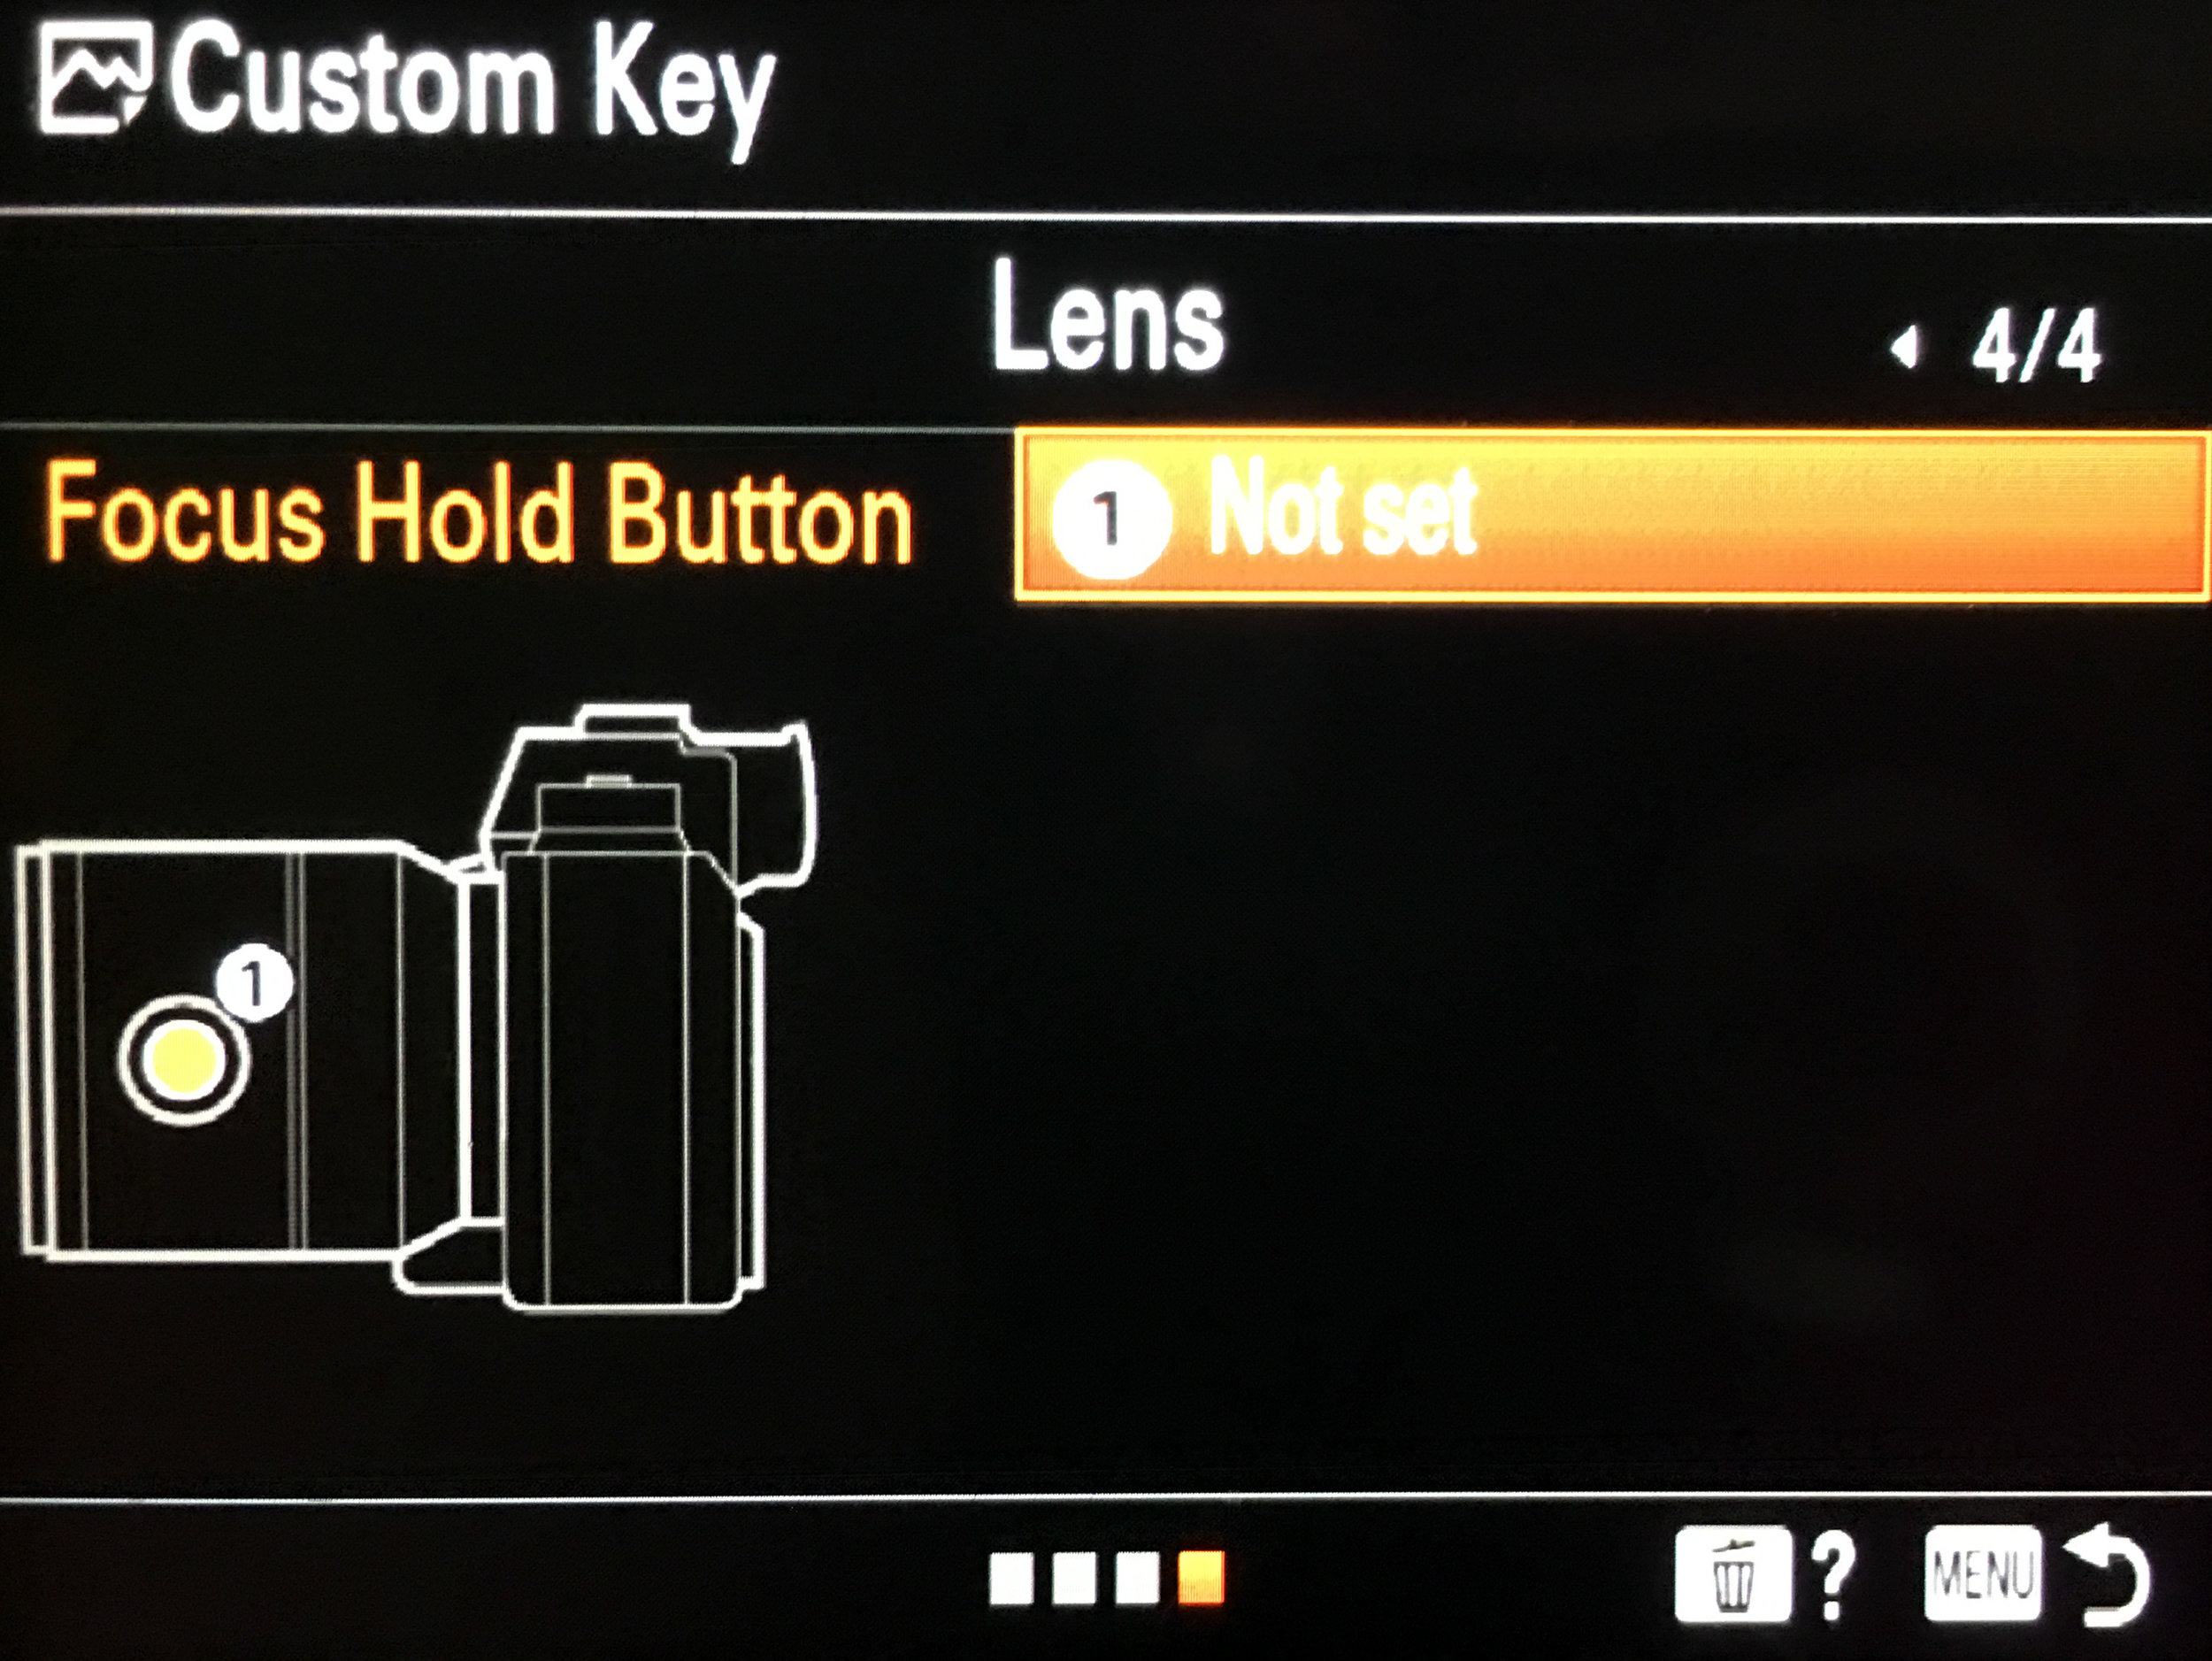
Lens Focus Hold Button Not set (button on G Master lenses)

  • MOVIE Custom Key

  • PLAYBACK Custom Key

Rear 1 C3 FTP Transfer

2 Fn Send to Smartphone

Top 1 C1 Finder / Monotor Sel

2 C2 Protect

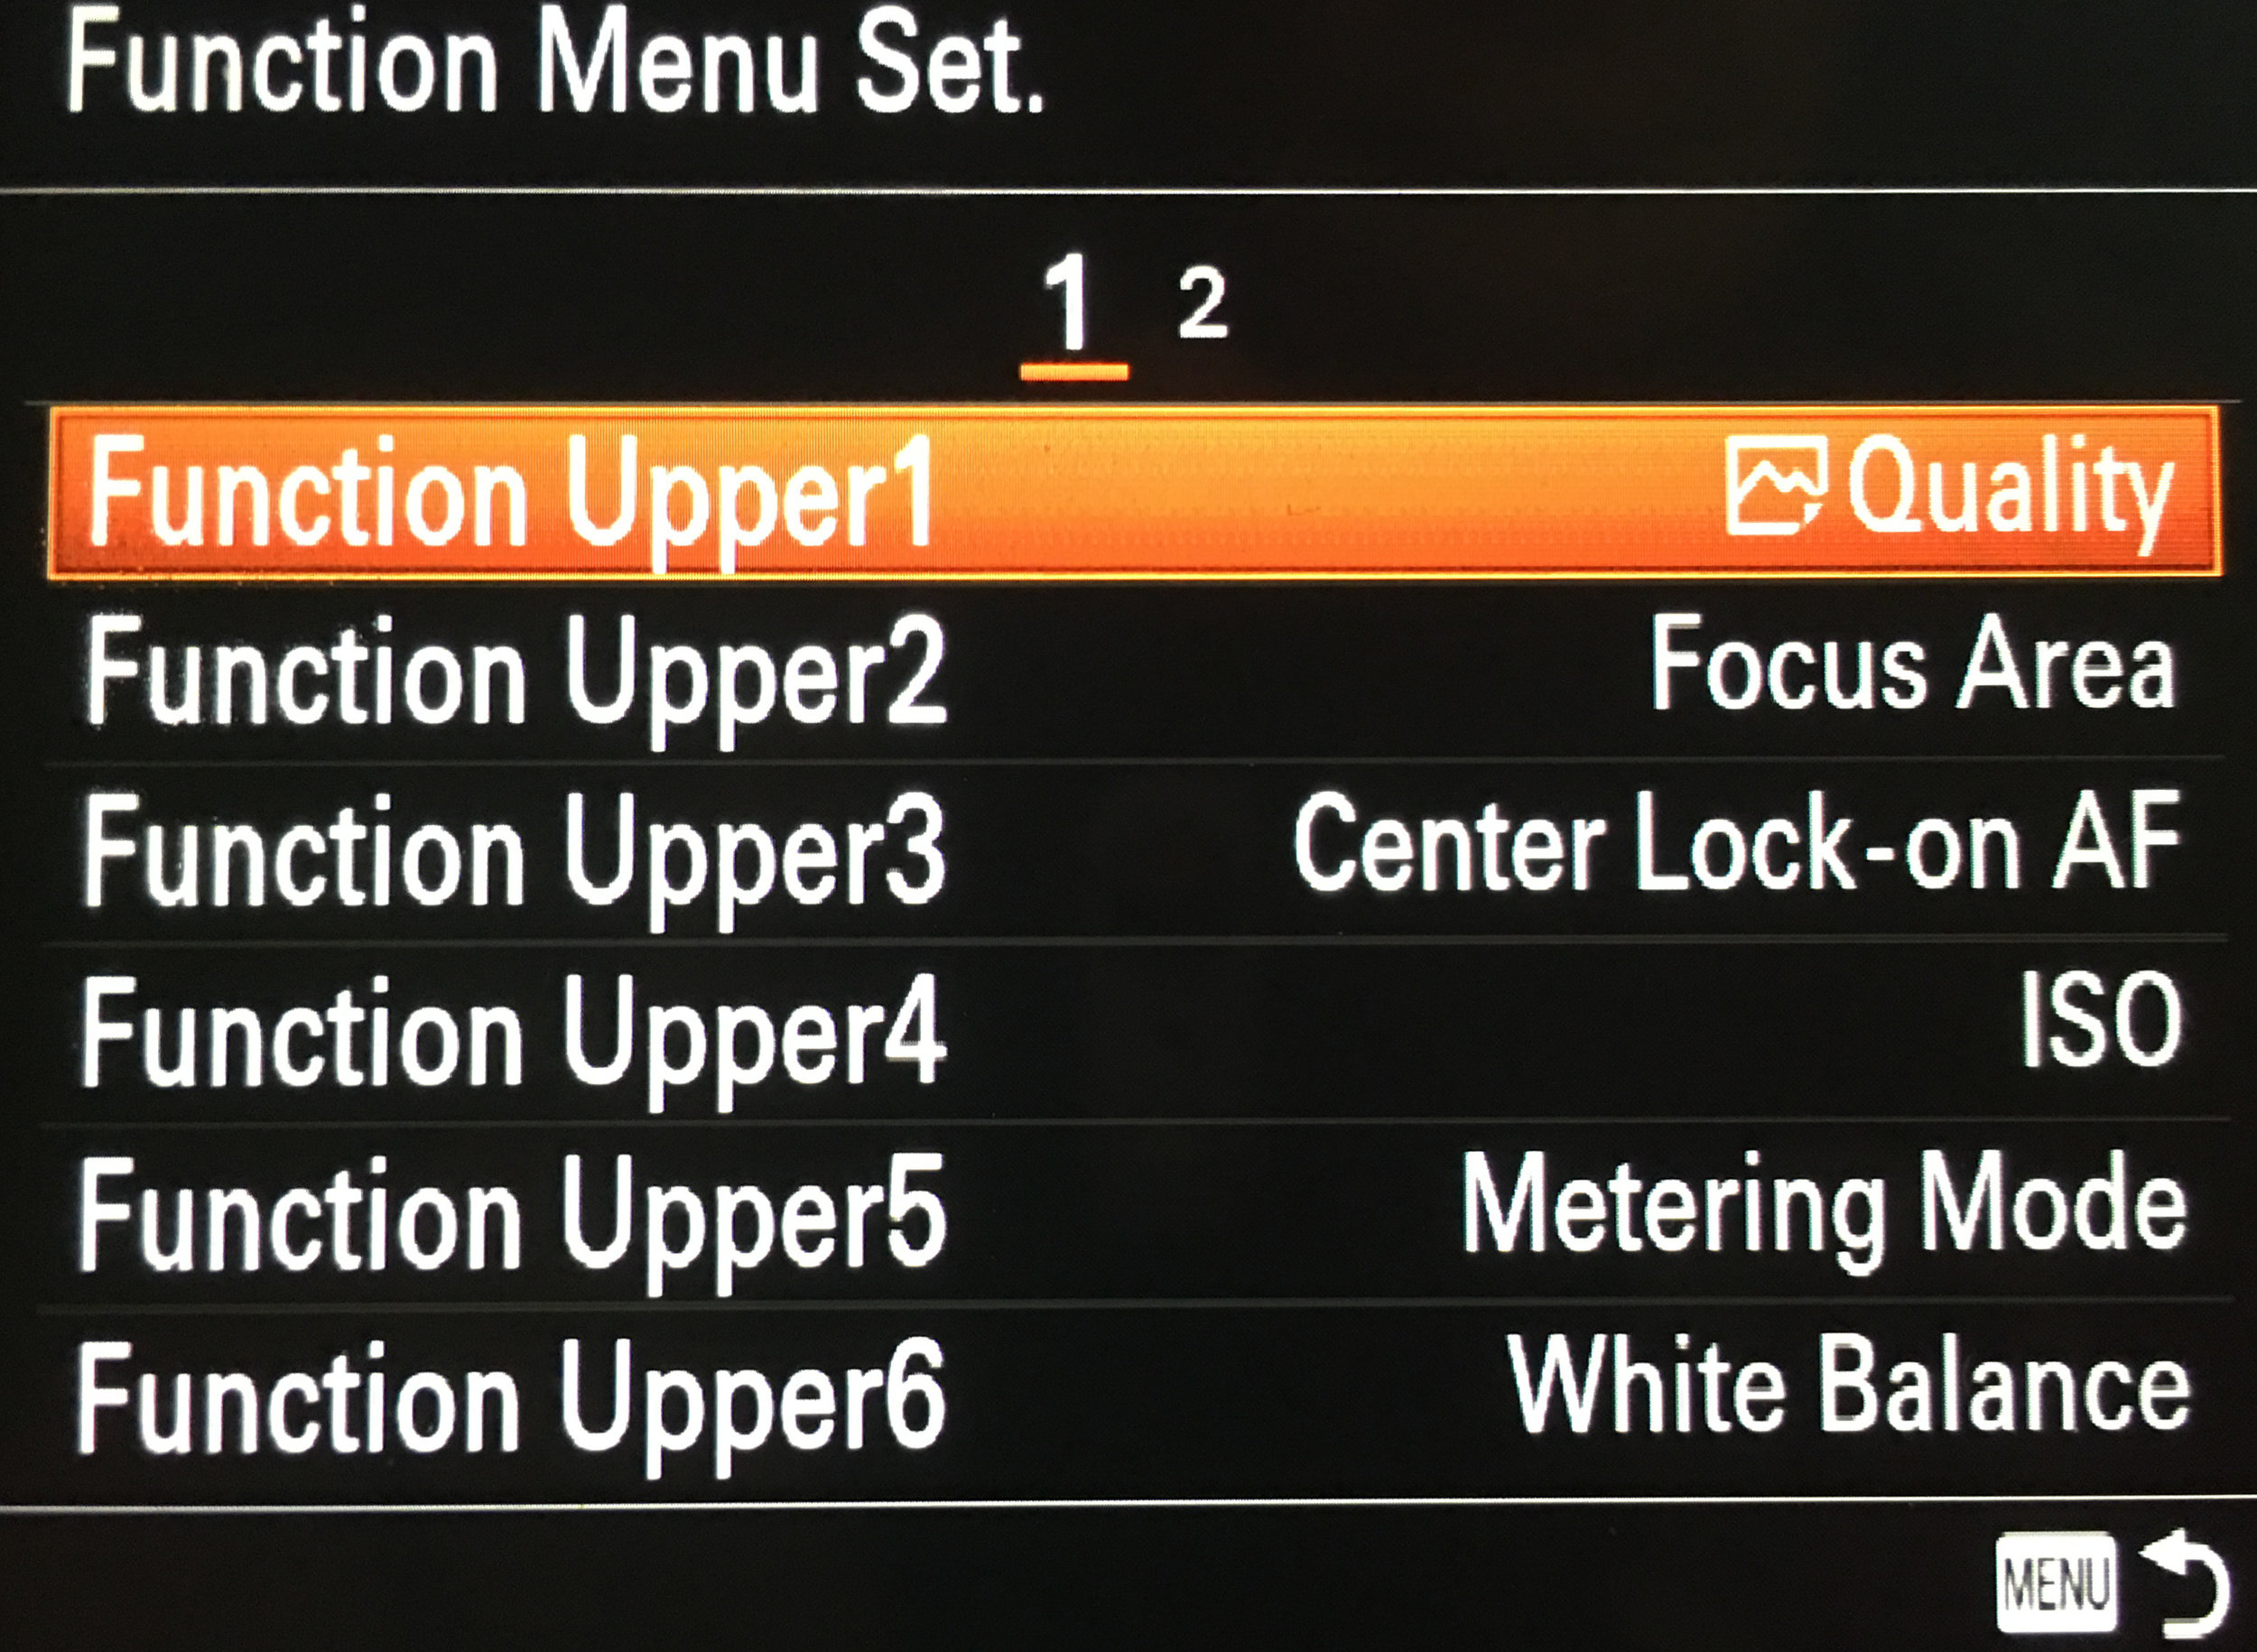
  • Function Menu Set

Upper 1 Picture File Format

Upper 2 Focus Area

Upper 3 Not Set

Upper 4 ISO

Upper 5 Metering Mode

Upper 6 White Balance

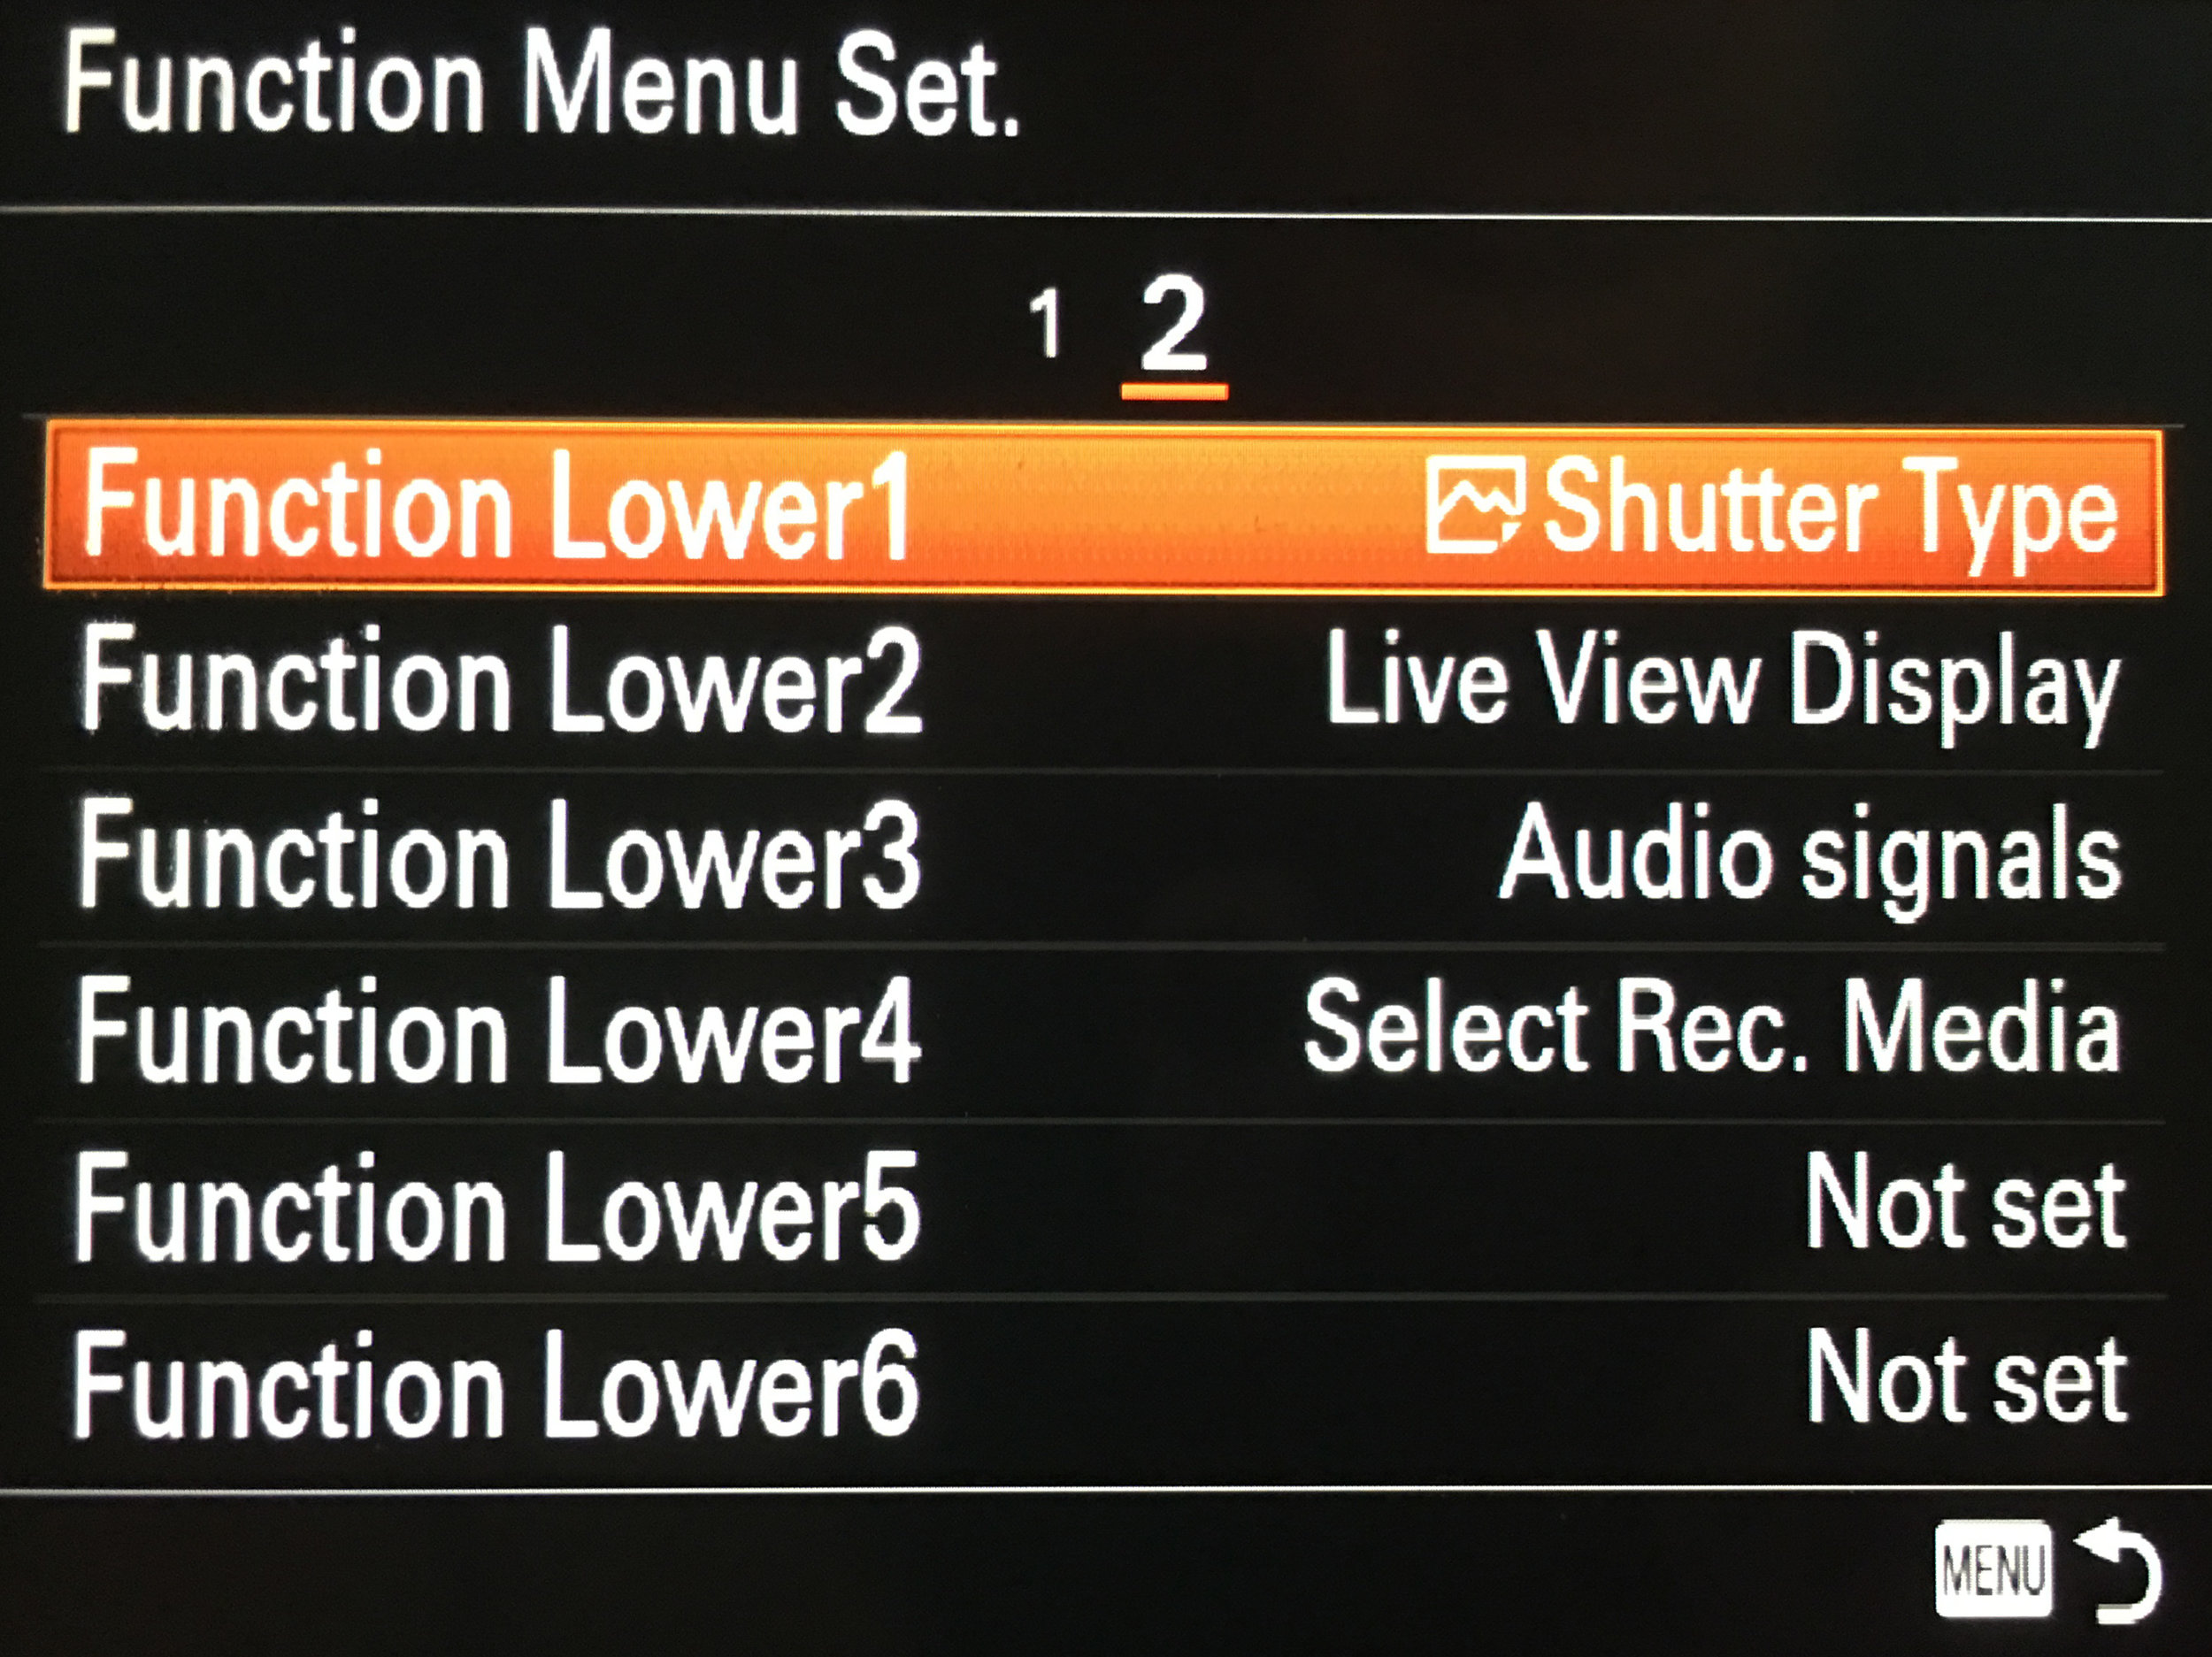
Lower 1 Shutter Type

Lower 2 Live View Display

Lower 3 Audio signals

Lower 4 Prioritize Rec. Media

Lower 5 Not Set

Lower 6 Not Set

  • My Dial Settings Front Dial Tv (Shutter), Rear Dial Av (Aperture)

  • Dial Setup SS (Front), F (Rear)

10/11   CUSTOM OPERATION 2

  • Av/Tv Remote Normal

  • MOVIE Button Movie Mode Only

  • Lock Operation Parts Off

11/11   CUSTOM OPERATION 3

  • Audio signals On: e-shutter only

This is where you can go completely silent.  I always have the shutter “ticking” sound unless the situation warrants complete silence.  Golf, tennis, video interviews, live TV, movie sets, wedding services, and soon, press conferences.

NETWORK (GREEN WORLD)

v5 3 Network.jpg

1/3   NETWORK 1

2/3   NETWORK 2

3/3   NETWORK 3

PLAYBACK (BLUE PLAY BUTTON)

v5 4 Playback.jpg

1/4   PLAYBACK 1

2/4   PLAYBACK 2

  • Enlarge Init Mag Standard Mag

  • Enlarge Initial Pos Focused Position

3/4   PLAYBACK 3

  • Enlarge Initial Position Focused Position

  • Select PB Media Slot 1 (JPEG-1 top, RAW-2 bottom, a9ii)

It doesn’t really matter which slot you send JPEGs an RAW to. I have it for JPEG going to the top on the a9ii because that’s how I have it on my older a9 so I wanted the JPEG slot to be the same for both - and by the same I mean the top slot as they changed the names of the slots between the two models. Over on SETUP 5 5/7 is Select Rec Media.  Whichever slot you select here will get JPEG and the other will get RAW.

When you go to this Select PB Media under PLAYBACK 1 3/4, regardless of what you select, it always defaults back to the settings of the “Select Rec Media” as soon as you take a picture.  Here’s the problem: whatever slot you have selected for “Select PB Media” that is the only slot which will lock an image.

4/4   PLAYBACK 4

  • Display as Group Off

  • Display Rotation Off

  • Image Jump Setting Front Dial, Protect Only

This is a REALLY COOL feature!!!

During a game or a shoot, I’m marking/locking my favorite images on the fly. When it’s time to either send them to your phone or show a client your or their favorite images (which you’ve locked), rotating the front dial shows only those protected images.

If you’re sending these to your Smartphone and you want to send multiple images, the same thing happens here - you are only rotating through the locked images which you just check off one by one to send. Really great, well done Sony!!!

SETUP (YELLOW SUITCASE)

5 Setup.jpg

1/7   SETUP 1

  • Monitor Brightness Manual

  • Viewfinder Bright Auto

  • Finder Color Temp 0

  • Volume Settings 15

  • Delete confirm “Delete” First

  • Power Save Start Time 5 Min

2/7   SETUP 2

  • Auto Power OFF Temp Standard

  • NTSC / PAL Selector NTSC, leave it alone unless you’re in Europe

  • Anti-dust Function On - closes the shutter when you power down

  • Touch Operation Off

3/7   SETUP 3

  • TC / UB Settings Leave it alone

  • Remote Ctrl Off

  • HDMI Settings Auto, 24p or 60p, On, Off, -, On

  • USB Connection Auto

4/7   SETUP 4

  • USB LUN Setting Multi

  • USB Power Supply On

  • PC Remote Settings PC only

  • Date / Time Setup YYYY-MM-DD

5/7   SETUP 5

  • Copyright Info Take the time to put your info in here!

  • Write Serial Number Yes

  • File Number Reset

  • Set File Name name files differently from each camera

6/7   SETUP 6

  • Rec. Media Settings

1 Prioritize Rec Media Slot 2

2 Recording Mode Sort (JPEG/RAW)

3 Auto Switch Media Off

7/7   SETUP 7

MY MENU (SILVER STAR)

6 My Menu.jpg

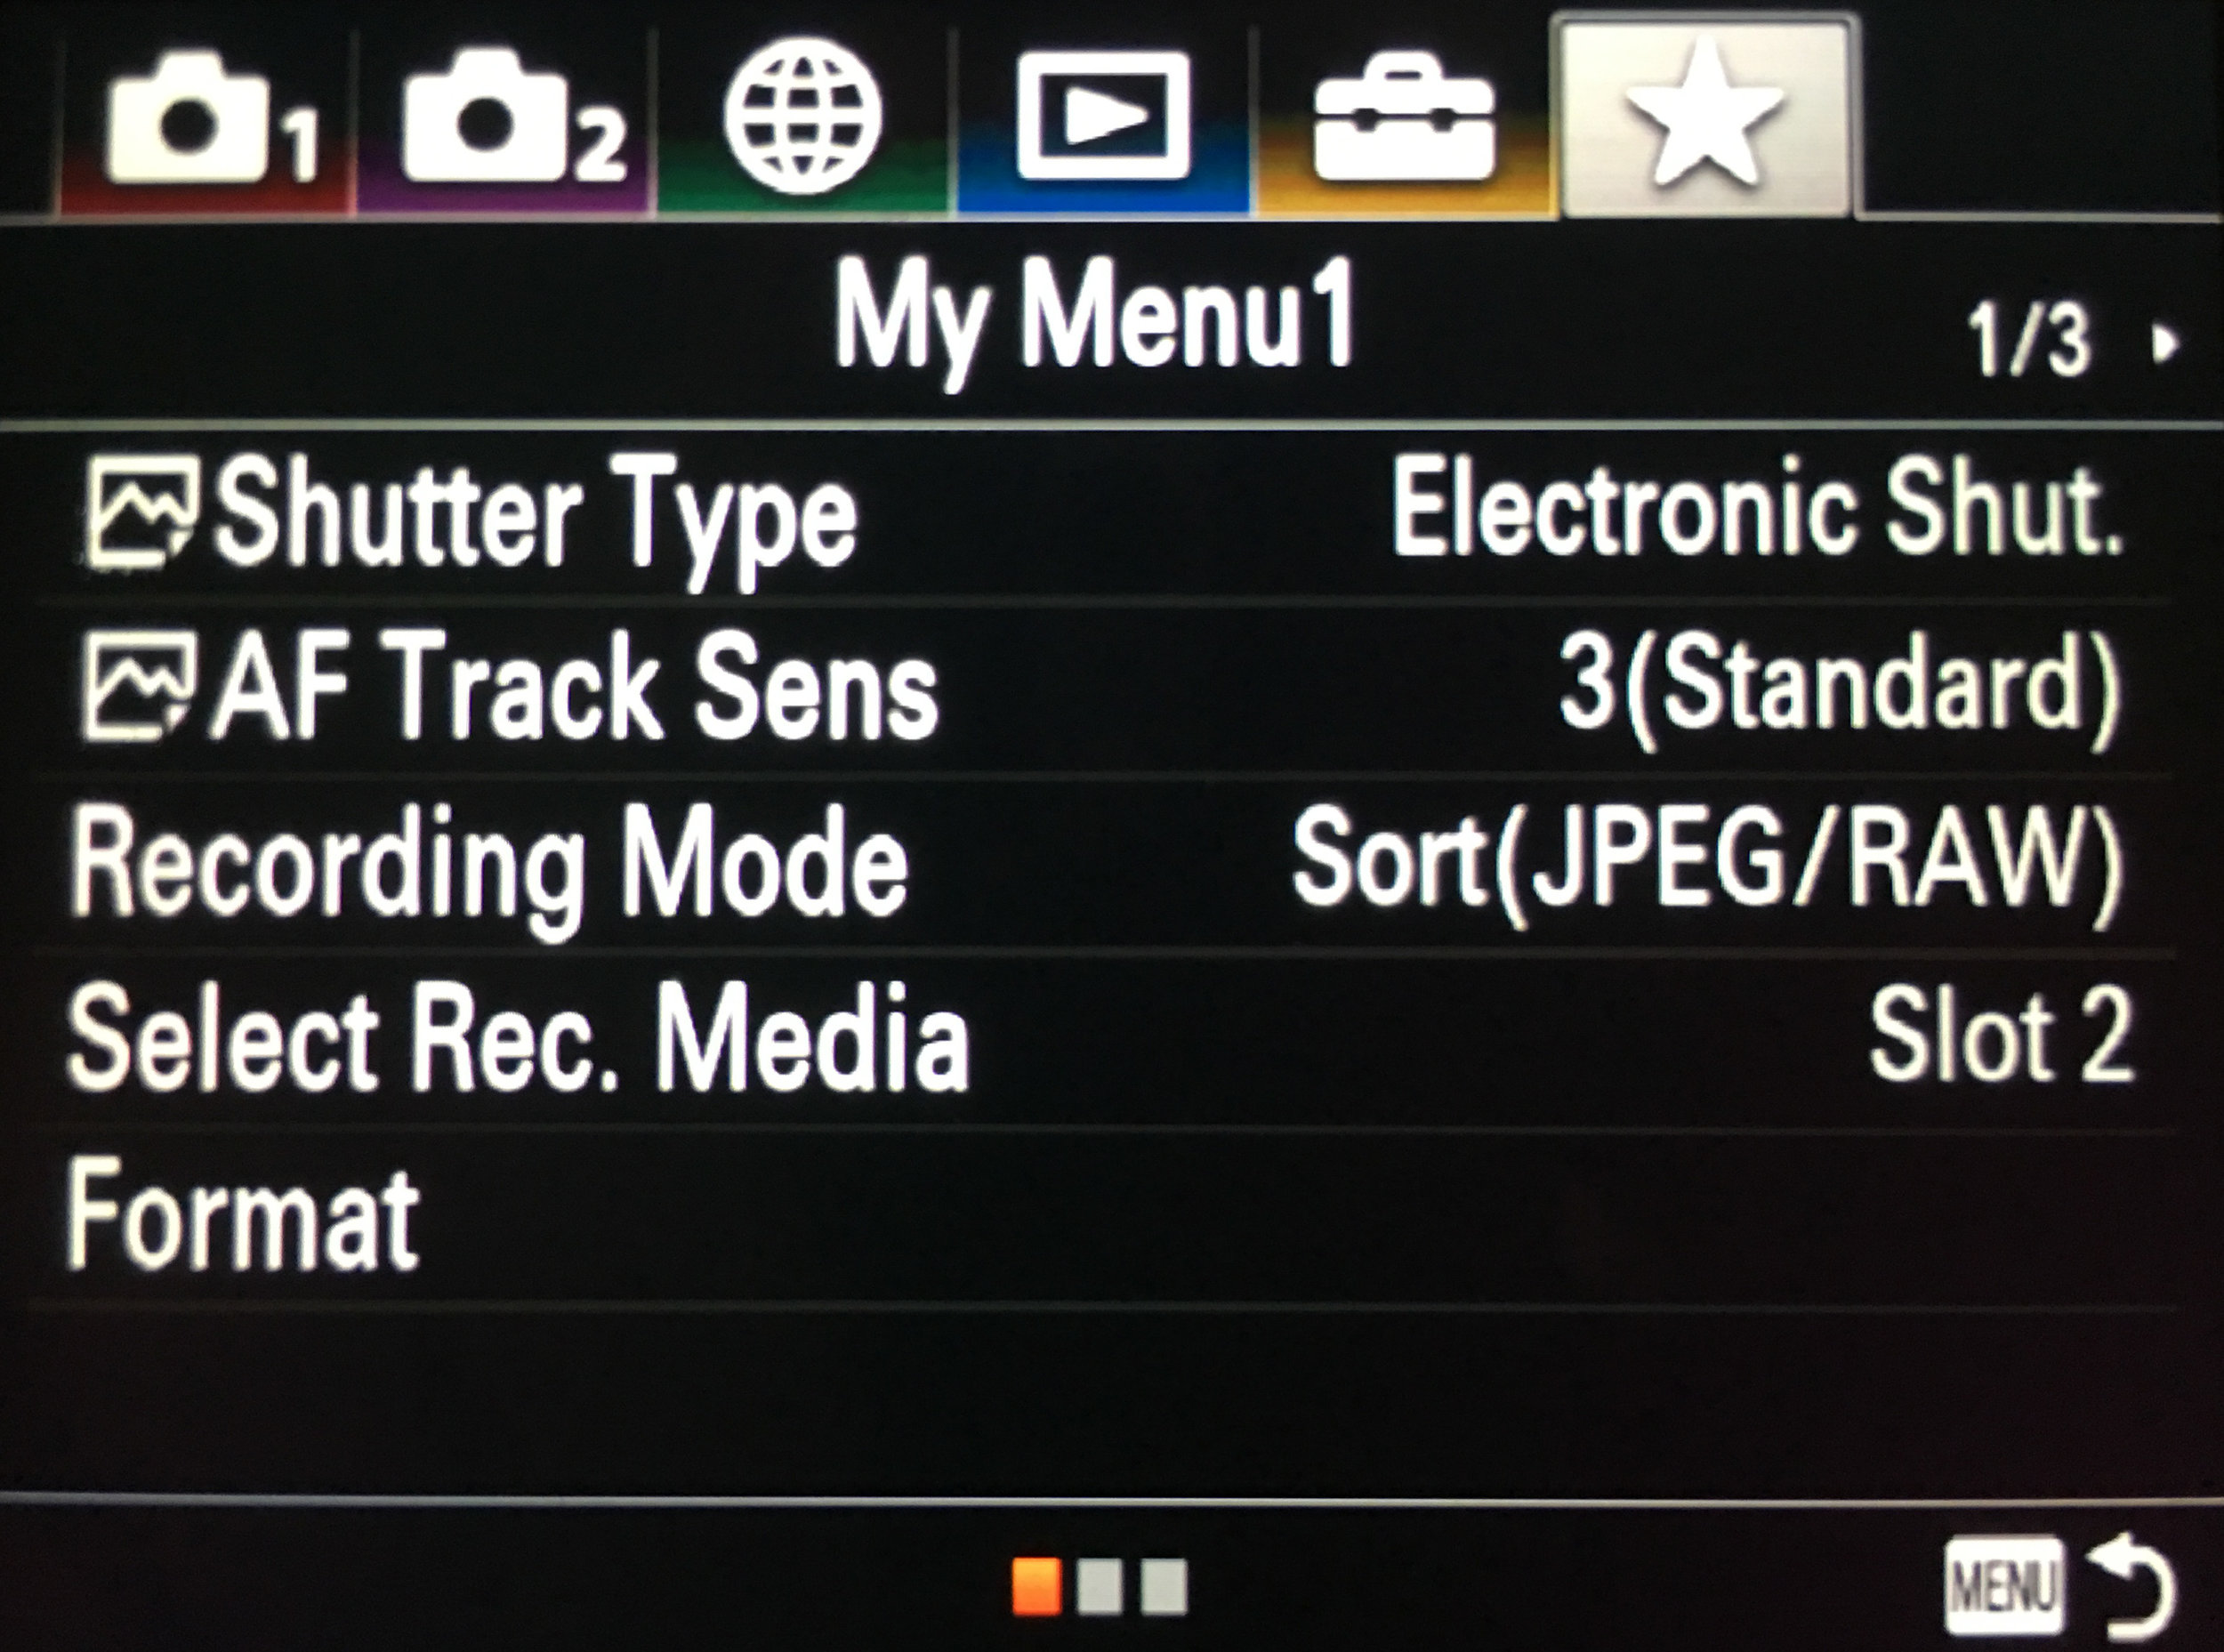
1/3   MY MENU 1

  • Shutter Type

  • Live View Display

  • Rec Media Settings

  • Select Media

  • Format

  • Date/Time Setup

  • Audio signals

  • FINDER/MONITOR

  • Display Media Info

  • AF Track Sens

(How I set up my) Sony A9

Sony A9 1.jpg

I’ve had several inquires about how I’ve set up my Sony A9’s. One of the complaints about the Sony menus is they are confusing. That’s a fair assessment… sort of. They are just set up differently Canon and Nikon. With C&N, there are around half a dozen main “tabs” each of which have several pages to scroll through. Sony also has about half a dozen main tabs, but instead of scrolling down through menu items which are not visible until scrolling, the Alpha series has you scroll to the right to different pages which are numbered in the upper RH corner.

The quick version is C&N menus scroll North-South, and Sony menus go East-West. Neither is necessarily better, they are just different. Give it a few weeks and the layout will seem normal.

Here are my Sony A9 settings. If you don’t see a menu item it’s either because it’s user specific (like Network Settings) or it’s a function/operation (like Format or Send to Smartphone).

CAMERA 1 (RED CAMERA)

1 Camera 1.jpg

1/13   QUALITY / IMAGE SIZE 1

  • Quality RAW & JPEG, RAW

RAW and JPEG - I shoot both at sporting events as I need to be able to transmit JPEG images to the social media managers throughout the course of the game

RAW - For proper shoots I usually only shoot RAW as there is no need for the JPEG

  • RAW File Type Compressed

  • Image Size L: 24M

  • Aspect Ratio 3:2

  • APC-C / Super 35mm Off

I leave the A9 in full frame mode.  Now, on my A7RIII, I have the C2 button set up to throw it into crop mode (APS-C) so my 400mm actually behaves like a 400 and a 600, both at f/2.8

  • Color Space n/a in RAW

2/13   QUALITY / IMAGE SIZE 2

  • High ISO NR Normal

  • Color Space sRGB

  • Lens Comp Auto, Auto, Off

3/13   SHOOT MODE / DRIVE

  • Self-timer Type Self-timer (Single) - 5 seconds

  • Bracket Settings Cont. Bracket, Off, ->0>+

  • 1/2 Recall n/a, only for 1, 2, or 3 on the mode dial

  • 1/2 Memory n/a

4/13   AF 1

  • Priority Set in AF-S AF

  • Priority Set in AF-C Balanced Emphasis

  • Swt. V/H AF Area AF Point

  • AF Illuminator Off

5/13   AF 2

  • Center Lock-on AF Off

  • AF Track Sens Typically 3 or 4

  • AF w/shutter Off

This is Sony-speak for back button focusing.  If you back button focus, turn this off, if you don’t leave it on.  If you’re not sure what BBF is, you’re putting the action of grabbing focus and opening the shutter on two different controls.  Almost all of the sports guys I know do this, but I do know a few who don’t so this is going to be a personal preference.

  • Pre-AF Off

6/13   AF 3

  • AF Area Regist Off

  • AF Area Auto Clear Off

  • Disp cont AF area On

7/13   EXPOSURE 1

  • Reset EV Comp Reset

  • Metering Mode usually Multi, but varies

  • Spot Metering Point Focus Point Link

8/13   EXPOSURE 2

  • Exposure step 0.3 EV

  • AEL w/shutter Auto

  • Exposure Std Adjust leave this alone unless you know what it is

9/13   FLASH

  • Flash Mode Flash Off

  • Flash Comp 0.0

  • Exp comp set Ambient & Flash

  • Wireless Flash Off

  • Red Eye Reduction Off

10/13   COLOR / WB / IMG PROCESSING

  • White Balance Often Auto, but varies, underwater is interesting

  • Priority Set in AWB Standard

  • DRO / Audo HDR Off

  • Creative Style Standard

  • Picture Effect Off, n/a in RAW

11/13   FOCUS ASSIST 1

  • Focus Magnifier Time No Limit

  • Initial Focus Mag x4.7

  • AF in Focus Mag On

  • MF Assist Off, but this is interesting…

If you throw the switch on your lens into MF (manual focus), as soon as you twist the focus ring, it zooms in to assist in grabbing focus.  More of a video thing, but really great as I don’t know of any Canon or Nikon cameras which do this.

  • Peaking Level Off

12/13   FOCUS ASSIST 2

  • Peaking Color White

13/13   FACE DETECTION / SHOOT ASSIST

  • Face Detection On if you are taking pictures of people

CAMERA 2 (PURPLE CAMERA)

2 Camera 2.jpg

1/9   MOVIE 1

  • File Format XAVC S HD / 4k or HD

  • Record Setting 24p 50M

  - in 4k you have 24p or 30p (and 30 should NEVER be an option!)

  - in HD you have 24p, 30p, 60p, and 120p (30 fps also sucks in HD)

  • S&Q Settings 24, 120 fps

  • Dual Video REC Off

2/9   MOVIE 2

  • AF Drive Speed Normal

  • AF Track Sens Standard (responsive can be too jumpy)

  • Auto Slow Shut On

  • Audio Recording On

  • Audio Level Display On

3/9   MOVIE 3

  • Audio Out Timing Live

  • Wind Noise Reduct On

  • Marker Display Off

  • Marker Settings Off

  • Video Light Mode Power Link

  • Movie w/ shutter Off

4/9   SHUTTER / STEADY SHOT

  • Shutter Type Mechanical / Electronic

Mechanical for using strobes

Electronic for everything else - you’ll need to be in this to get the 20 fps

  • e-Front Curtain Shut On (only in Mechanical shutter mode)

  • Release w/o Lens Disable

  • Release w/o Card Disable

This should NEVER be turned on!!!  Never, ever, ever.  Leave this on and at some point, you’re going to shoot a game or a session only to discover you have zero images. Then you’ll get sacked.  DISABLE this now!

  • SteadyShot On

  • SteadyShot Settings Auto

5/9   ZOOM

6/9   DISPLAY / AUTO REVIEW 1

  • DISP Button Lots of option here for both the MONITOR and FINDER

MONITOR  -  No Disp Info, Histogram, Level, For Viewfinder

FINDER  -  No Disp Info, Histogram, Level

  • FINDER / MONITOR Auto (usually)

This is really great until you get into a dark room at which time the lack of light makes the camera believe you are looking through the viewfinder and thus blocking the light sensor which determines whether to use the viewfinder or monitor.  I have C1 set to toggle this when necessary.

  • Finder Frame Rate High

  • Zebra Off

  • Grid Line Off

  • Exposure Set Guide Off

7/9   DISPLAY / AUTO REVIEW 2

  • Live View Display Setting Effect ON (Off for strobes)

  • Shoot Start Disp Off

  • Shoot Timing Disp On: Type 4

  • Cont Shoot Length Always Displayed

  • Auto Review Off

8/9   CUSTOM OPERATION 1

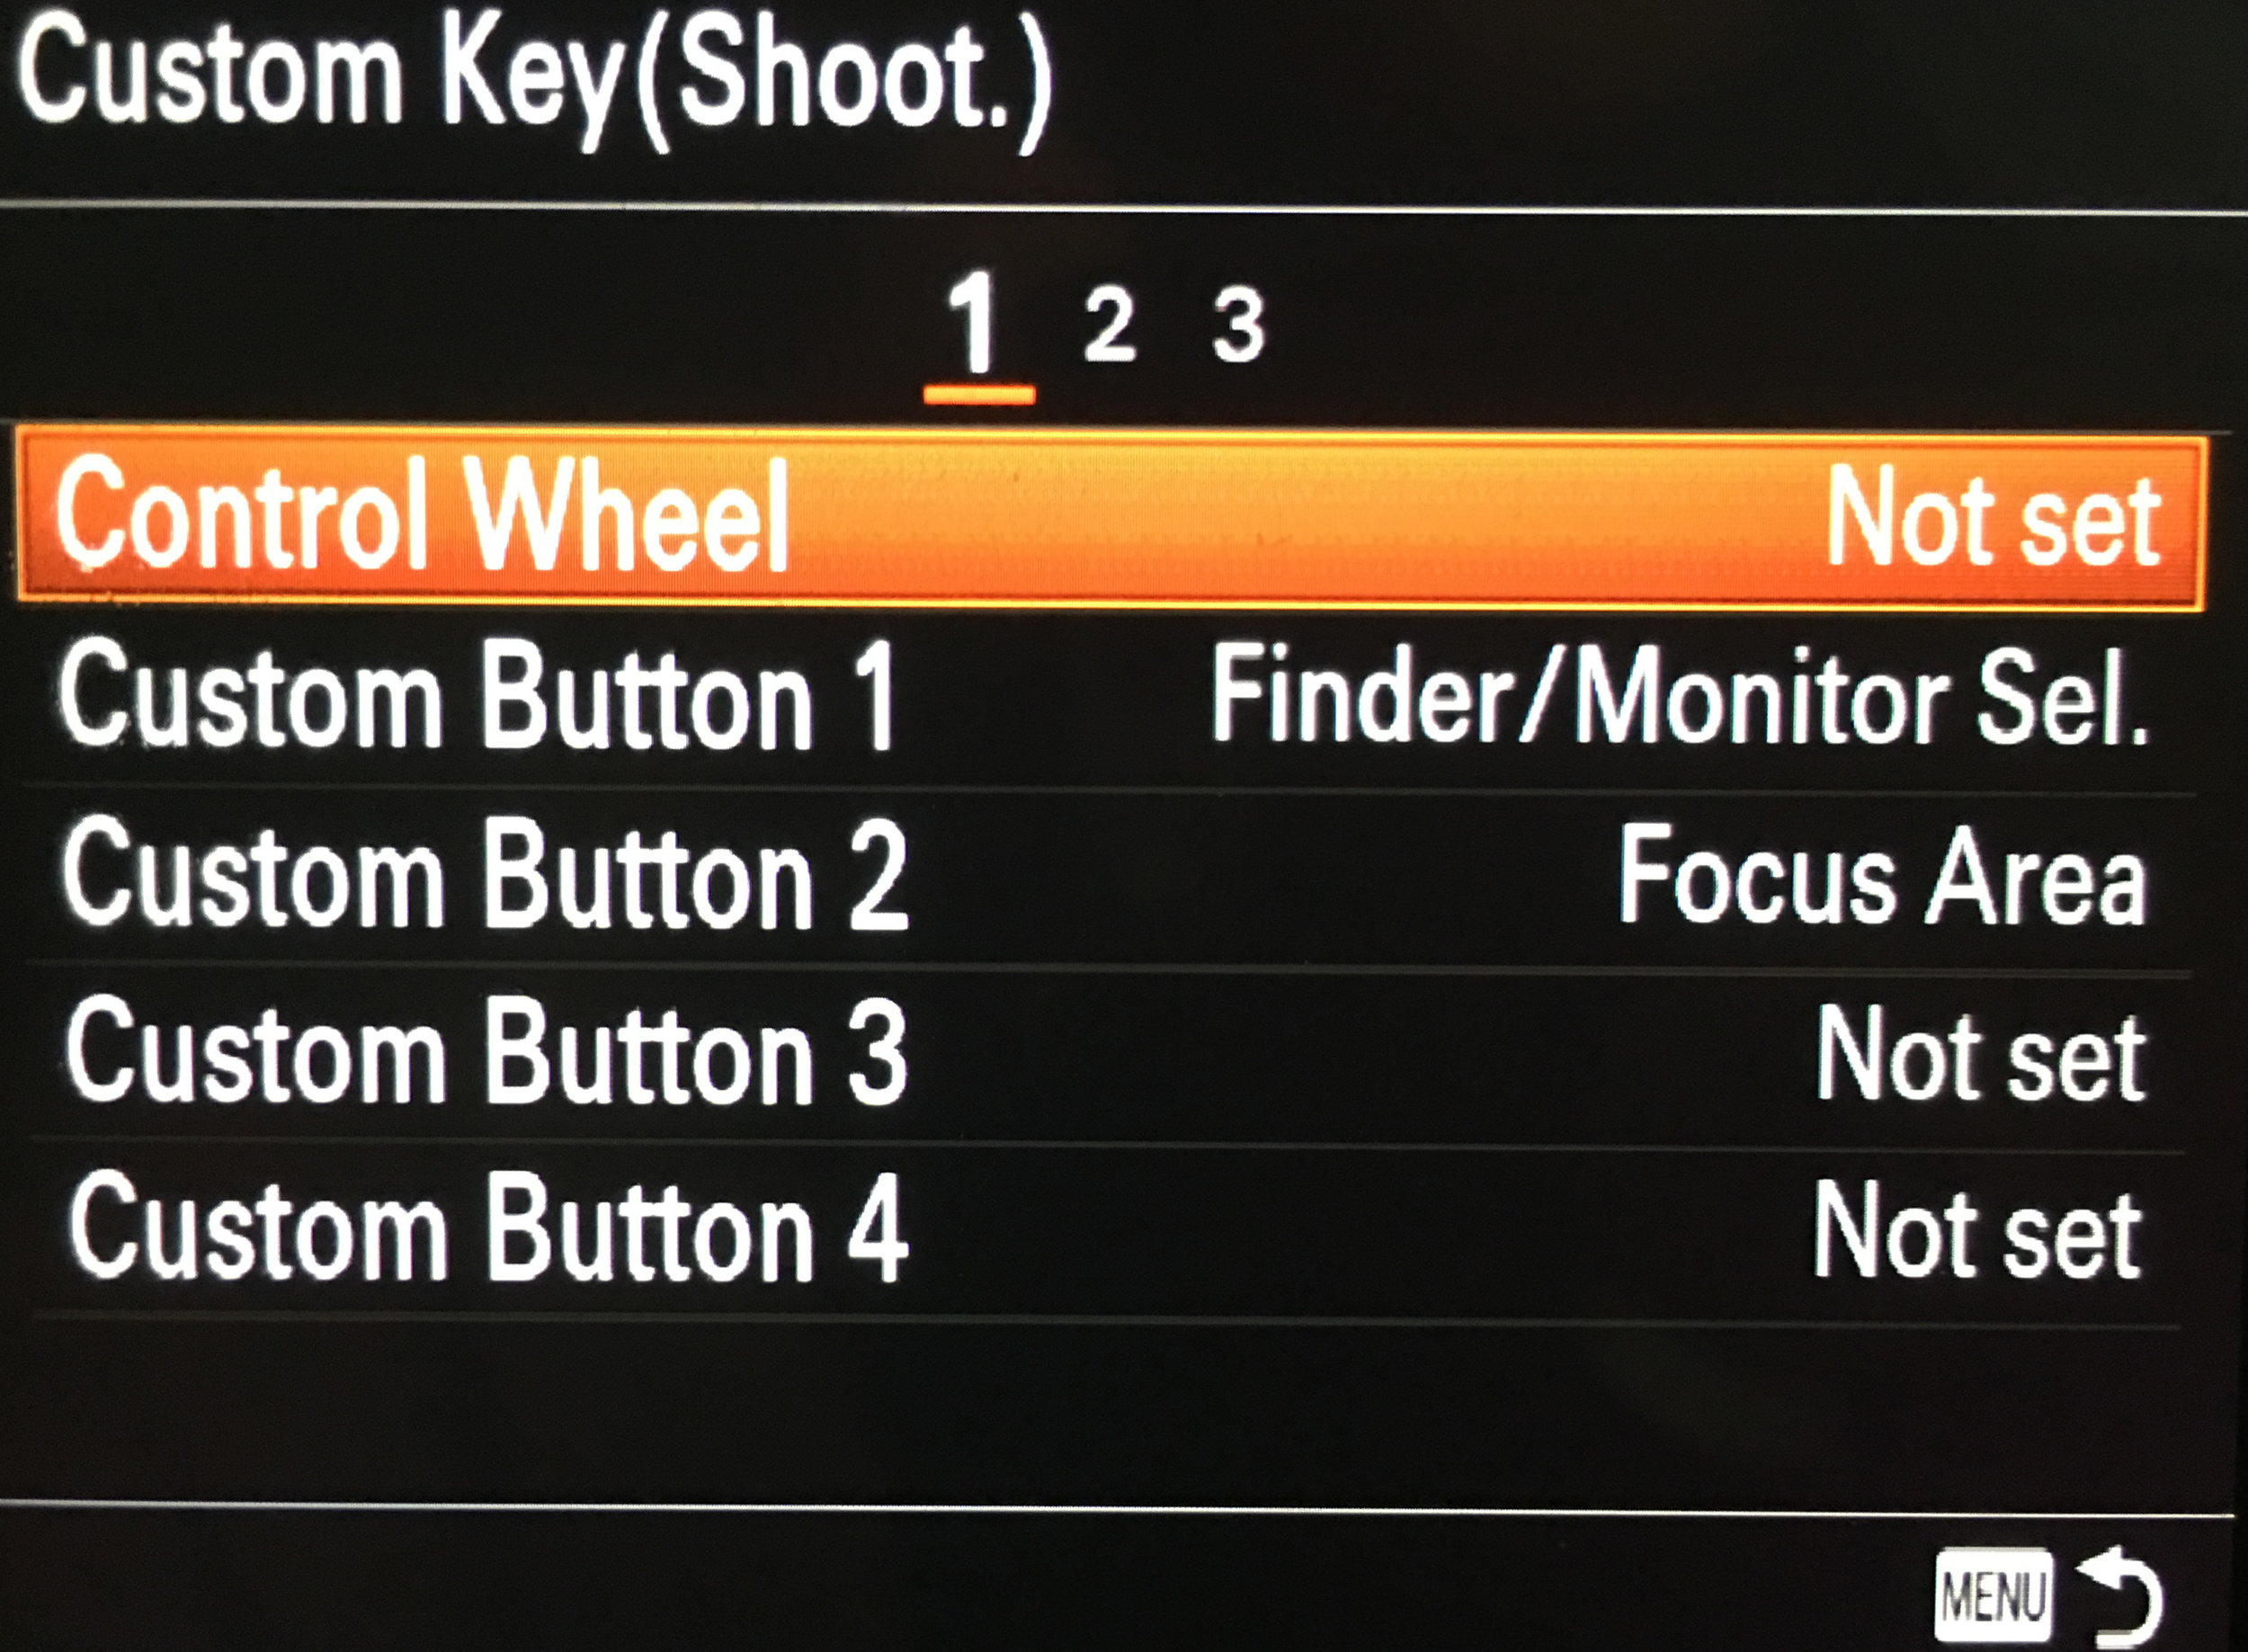
  • Custom Key (Shoot)

1 Control Wheel Not set

Custom Button 1 Finder/Monitor Sel

Custom Button 2 Focus Area

Custom Button 3 Not set

Custom Button 4 Not Set

2 Multi-Slc Center Btn Focus Standard

Center Button Focus Magnifier (only in AF-S mode)

Left Button White Balance

Right Button ISO

Down Button Not Set

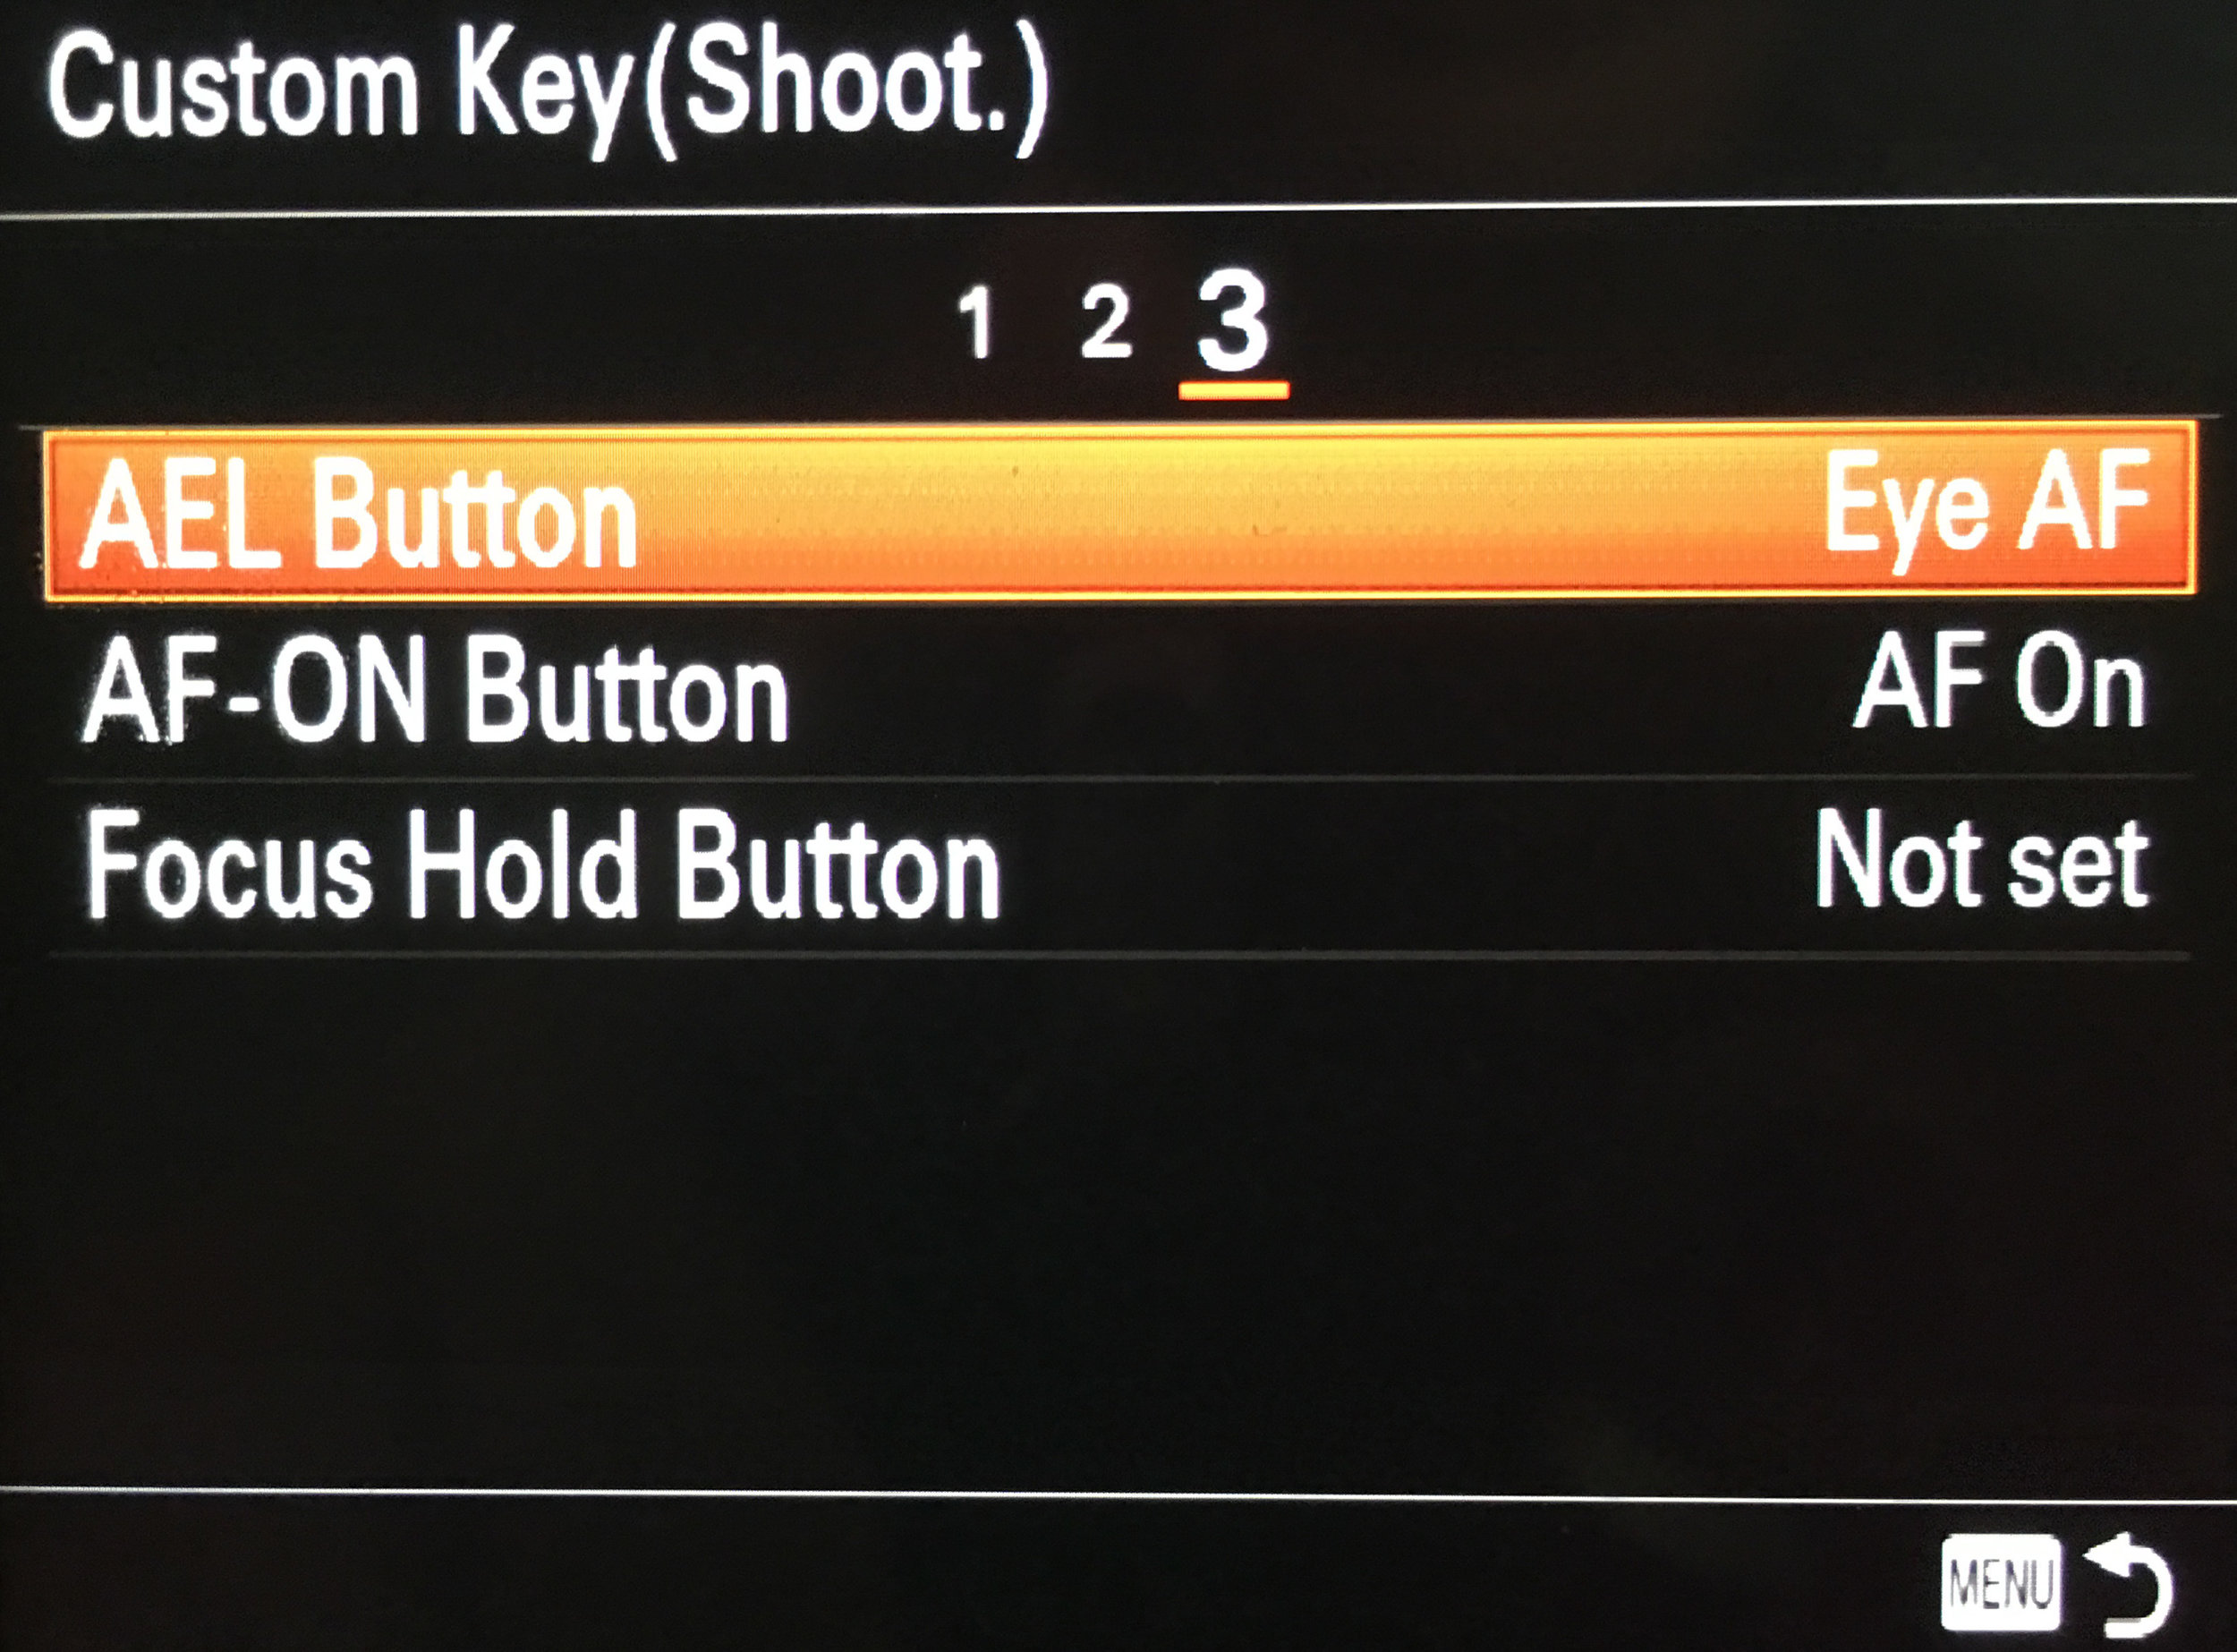
3 AEL Button Eye AF

AF-ON Button AF On

Focus Hold Button Not set (the button on G Master lenses)

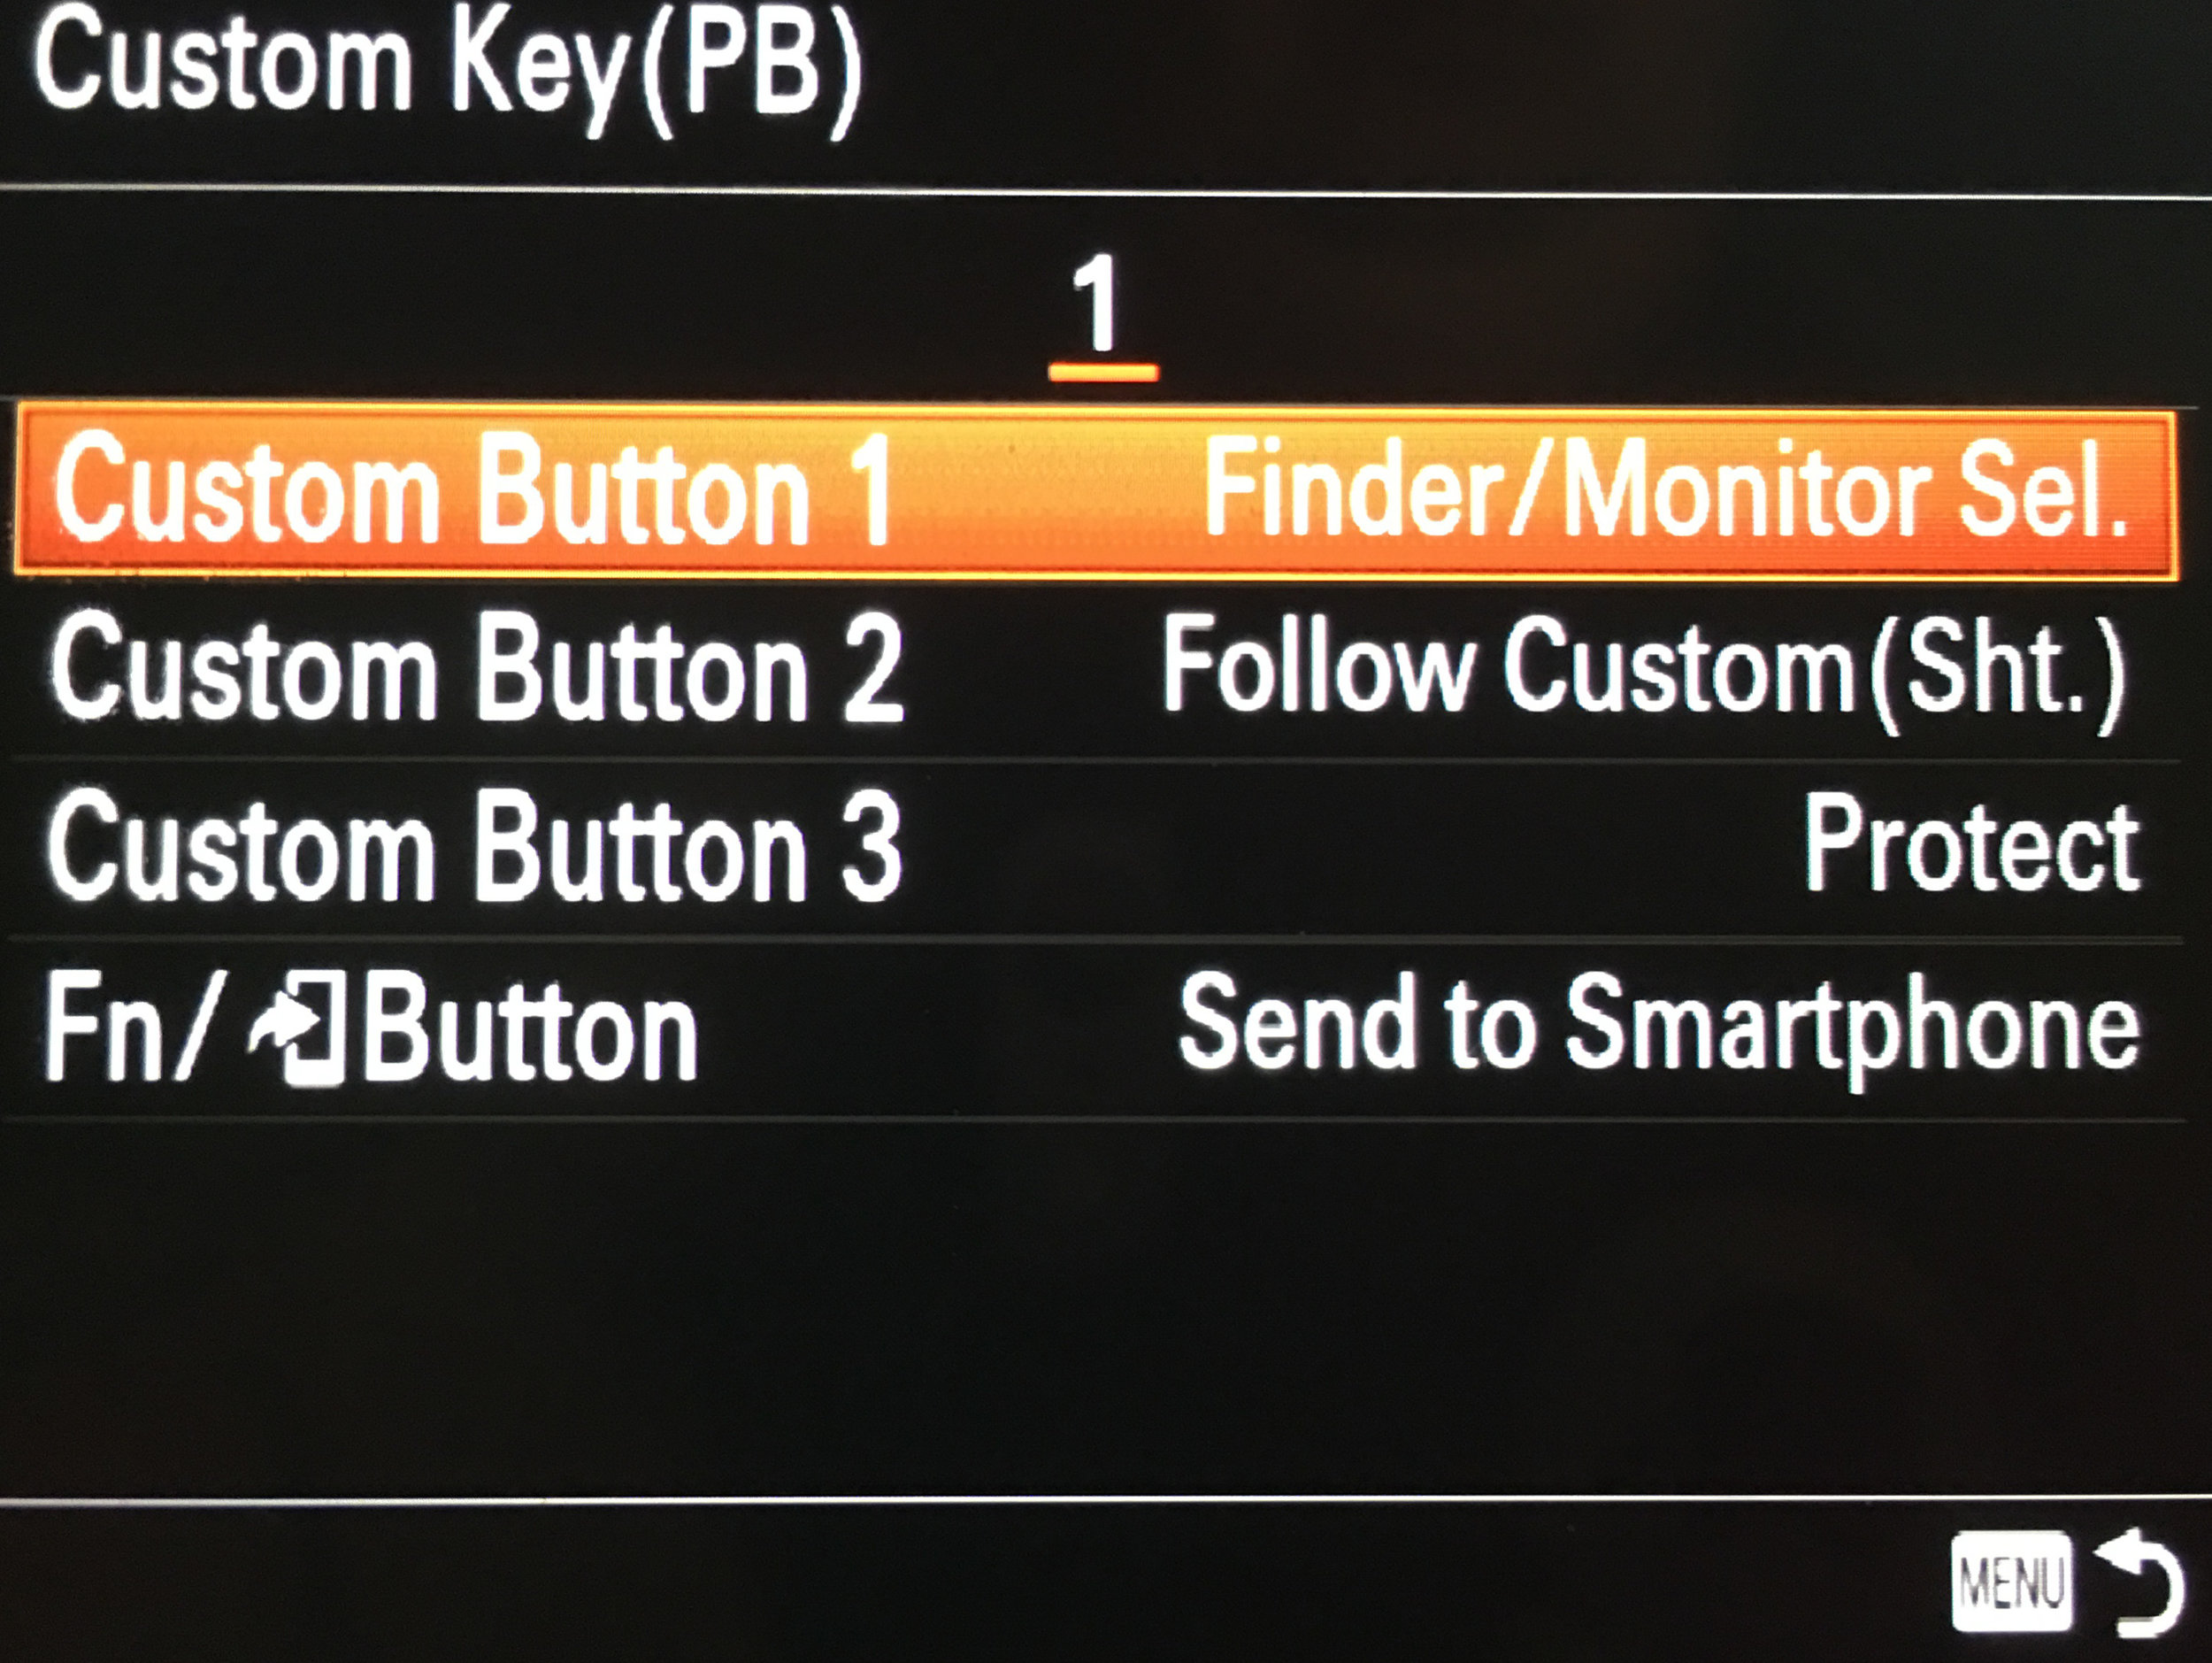
  • Custom Key (PB)

1 Custom Button 1 Finder/Monitor Set

Custom Button 2 Follow Custom (Sht.) - Not Set

Custom Button 3 Protect (lock image)

Fn/ Button Sent to Smartphone

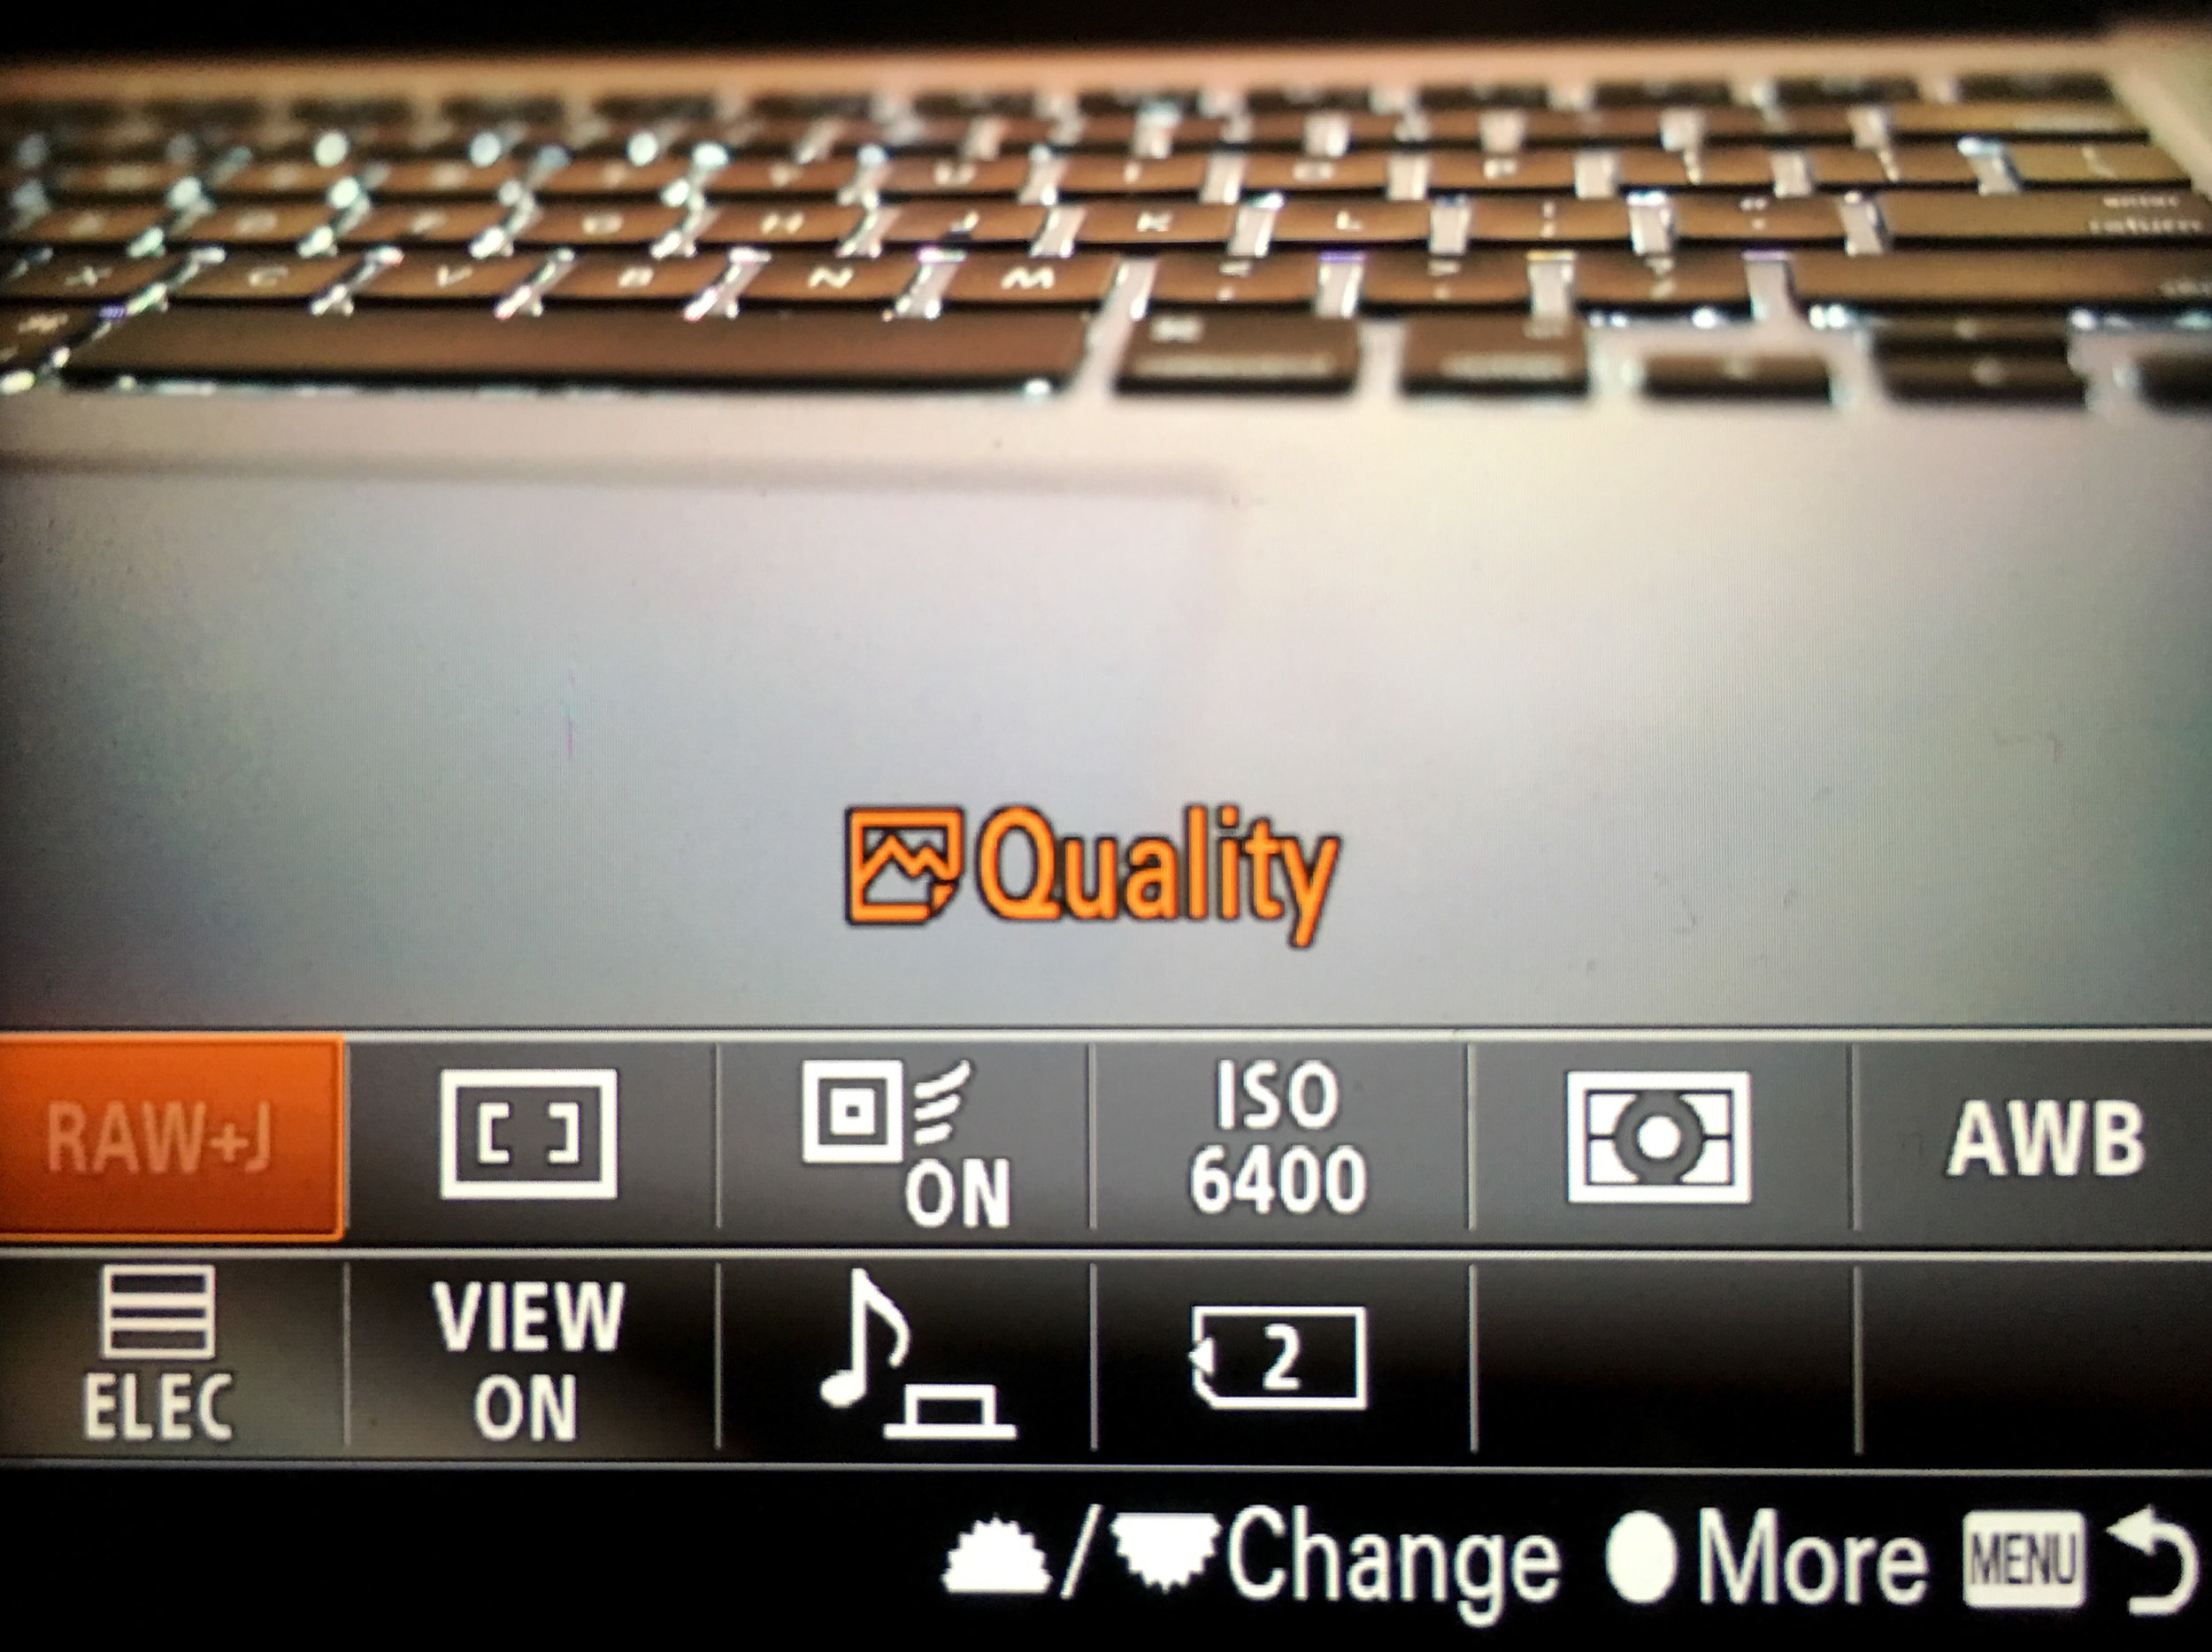
  • Function Menu Set

Upper 1 Quality

Upper 2 Focus Area

Upper 3 Center Lock-on AF

Upper 4 ISO

Upper 5 Metering Mode

Upper 6 White Balance

Lower 1 Shutter Type

Lower 2 Live View Display

Lower 3 Audio signals

Lower 4 Select Rec. Media

Lower 5 Not Set

Lower 6 Not Set

  • Dial Setup SS / F - Shutter Speed (front), Aperture (back)

  • Dial Ev Comp Off

  • MOVIE Button Movie Mode Only

9/9   CUSTOM OPERATION 2

  • Lock Operation Parts Off

  • Audio signals On: e-shutter only

This is where you can go completely silent.  I always have the shutter “ticking” sound unless the situation warrants complete silence.  Golf, tennis, video interviews, live TV, movie sets, wedding services, and soon, press conferences.


NETWORK (GREEN WORLD)

3 Network.jpg

1/3   NETWORK 1

2/3   NETWORK 2

3/3   NETWORK 3

PLAYBACK (BLUE PLAY BUTTON)

4 Playback.jpg

1/3   PLAYBACK 1

  • Display Rotation Auto

  • Select PB Media Slot 2 (JPEG-2 slow/top, RAW-1 fast/bottom)

Slot 1 is the fast slot and Slot 2 is slow.

If you send RAW and JPEG to both cards, then you are fine.

If you SORT RAW to one card and JPEG to another, this is a mess.  Over on SETUP 5 5/7 is Select Rec Media.  Whichever slot you select here will get JPEG and the other will get RAW.  Obviously this needs to be set to Slot 2 if you are sorting files as that is the slower slot.

When you go to this Select PB Media under PLAYBACK 1 1/3, regardless of what you select, it always defaults back to the settings of the “Select Rec Media” as soon as you take a picture.  Here’s the problem: whatever slot you have selected for “Select PB Media” that is the only slot which will lock an image.

If you’re shooting RAW to Slot 1 and JPEG to Slot 2, you can’t lock a RAW image without going “Select PB Media” every time.  Locking an image should do it on both cards, not just one.

This is something which Sony needs to fix in a firmware update as it works correctly on the A7RIII, but it’s missing options on the A9.  On the A7RIII, you choose which card to send RAW and JPEG (and it’s spelled out much better) and then you choose your PB card.

2/3   PLAYBACK 2

  • Enlarge Init Mag Standard Mag

  • Enlarge Initial Pos Focused Position

3/3   PLAYBACK 3

SETUP (YELLOW SUITCASE)

5 Setup.jpg

1/7   SETUP 1

  • Monitor Brightness Manual

  • Viewfinder Bright Auto

  • Finder Color Temp 0

  • Volume Settings 15

  • Delete confirm “Delete” First

2/7   SETUP 2

  • Per Save Start Time 1 Min

  • Auto Pwr OFF Temp Standard

  • NTSC / PAL Selector NTSC, leave it alone unless you’re in Europe

  • Touch Operation Off

  • Demo Mode Off

3/7   SETUP 3

  • TC / UB Settings Leave it alone

  • Remote Ctrl Off

  • HDMI Settings Auto, 24p or 60p, On, Off, -, On

  • USB Connection Auto

  • USB LUN Setting Multi

4/7   SETUP 4

  • USB Power Supply On

  • PC Remote Settings PC only

  • Date / Time Setup YYYY-MM-DD

5/7   SETUP 5

  • File Number Reset

  • Set File Name name files differently from each camera

  • Select Rec. Media Slot 2 (RAW to 1, JPEG to 2)

  • Recording Mode Sort (JPEG / RAW)

6/7   SETUP 6

7/7   SETUP 7

MY MENU (SILVER STAR)

6 My Menu.jpg

1/3   MY MENU 1

  • Shutter Type

  • AF Track Sens

  • Recording Mode

  • Select Rec Media

  • Format

  • Lock Operation Parts

  • Auto Review

  • Audio signals

  • Live View Display

  • FINDER/MONITOR

  • Display Media Info

The anatomy of media day

First post of 2018 and I'm going to talk about working a media day for a professional sports franchise, as I've received numerous social messages asking how something like this works.  In January, Nashville SC our newly awarded Major League Soccer (MLS) franchise conducted it's media day for the upcoming 2018 season, where the team will play in the United Soccer League (USL) before moving up to MLS in either 2019 or 2020.  For those unfamiliar with the American soccer league structure, the USL would be similar to AAA baseball, just one level below the "big leagues."  Many USL players have played in MLS and other top level leagues from around the world, so these are elite level athletes.

NashSC Media Day.jpg

SPARKNOTES VERSION (for those who are not going to read the entire post)

These points apply the same if you are working with your local high school team:

  • It takes several people to make this happen, the photographer is just one of many

  • Have your gear in order and really know how to use it

  • Plan ahead and then plan some more

  • You are a professional - the client comes first, never betray their trust

  • Be thankful you get to make a living doing this

PLANNING

In addition to the crew, there are 30+ players and coaches who will be turning up, along with front office employees, possibly ownership, along with selected members of the media, so the venue has to be large enough to accommodate 50-70 people.  Once it's been selected, dates and times need to be coordinated with the venue, crew, coaches, and players.  Then you have to figure out the type of content you are going to capture, which in this case was both still images and video.  These are professional athletes, so always make the best use of their limited time as they have busy schedules.

There were close to 10 people on this shoot doing various tasks.  Overseeing the planning were James Cannon, VP of Marketing & Communications, Austin Gwin, the Director of Communications and PR, and Lucy Gonzalez, Head Graphic Designer.  The 6-7 pages of documentation I received about a week out was very thorough and contained everything from an extensive shot list to a down to the minute schedule.  Nashville SC is part of the USL, so the league has a specific look required for certain images which appear on the team website.  All professional sports leagues have requirements like this as do most major media outlets (ABC, NBC, CBS, FOX, ESPN, etc.)

THE SHOOT

The players were scheduled to arrive at 2:00 PM and had a hard deadline of 5:00 PM to finish as they had another event scheduled for later in the evening.  This meant we had less than three hours to capture everything.  Along with most of the crew, I turned up about two hours out to get everything set up and dialed in so we would be ready to go from the moment the players turned up a few hours later.  There were 25 players split into five groups, with five stations for them to visit.  This was great planning as no more than five players would be at any station at a given time, and with an equal number of groups and stations, the players would always have something to do with no "dead time."

Before going forward with anything, player (and crew) safety is ALWAYS the most important thing.  Don't assume a player can do something before directing them, always ask.  Maybe they've just had a long training session and are exhausted, maybe they haven't warmed up or stretched, or maybe they are 100% ready to do anything.  ALWAYS ASK.

Another VERY IMPORTANT thing is the images I take should always be considered confidential.  This means they don't turn up on my website, social media, blog, etc., before they show up on the client communication channels.  Additionally, I don't text them to my friends or even family members.  Same with mobile phone images of the day.  Anything I post publicly from the shoot is always cleared with communications personnel before posting.  If in doubt, don't post!  Not only is this professional etiquette, it is essential if you want to keep working with high profile clients as trust is paramount.  The old adage hold true:  "Those who speak, don't know... and those who know, don't speak."

Diagram 1.jpg

Getting back to the five stations... they were: headshots, action shots, hype video, social media video, and media training.  I did the action shots along with the "gatorade" close ups - super tight headshots where the players look really intense!  Assisting me was Lucy Gonzalez, the head graphic designer for the team.  I shot tethered to my MacBook Pro and she manned the computer and as we shot them, she gave the OK.  It made sense to have her with me she is the one who will have to generate social media, program, stadium, advertising, billboard, and promotional graphics with what I shot on the day.

At the second photo station, Mackenzie Crooks took care of the headshots which were used for player bios on the website.  Will McCarty and Andrew Fair worked two additional stations as they oversee digital content and social media for the club and were assisted by Sandra Galvez.  The video they both shot will be used in the stadium and on social media (Instagram stories, etc.).  The final station was media training.

In addition to all of that, the final 30 minutes of the day was used to shoot about half a dozen of the players wearing Nashville SC apparel.  These were done as lifestyle shots rather than as catalogue-style shots.

POST

We got everything we needed on the media day and got everyone out on time.  The final task was to make selects, edit, export, and upload everything to my SmugMug server where James, Austin, Lucy, Andrew, and Will can download and access everything.  It is ESSENTIAL to have a naming structure so specific images can easily be found as there were over 600 selects from the day.  In addition to names, each image file was assigned a series of keywords which are imbedded into the metadata when exporting from Lightroom.  Player name, jersey color, what they are doing, date, year, etc.

FINAL THOUGHTS

I cannot stress this enough, but as I said in at the top of this post, this is a group effort.  If you want to work at this level - or any level - and get asked back, you have to know your stuff, know your gear, and be able to work quickly as well as adapt to changes on the fly.  But most of all, you have to be someone people want to have around.

The Nashville SC media day was a success.  Yes, we got tons of great content which will used throughout the season, but everything worked because of all of the great people involved.  First class professionals like James, Austin, Lucy, Will, Andrew, Mackenzie, Sandra, Coach Gary Smith, his staff and players, Chris Jones and Court Jeske.

I count it a privilege get to work with all of them.

GEAR (for those who care)

I shoot with Nikon equipment.  On this shoot, I used my D810 for all of the action and "gatorade" images.  The D810 shoots 36 MP so the files are huge.  This allows for cropping without losing resolution.  It's great when something is going to be used in a large format like a digital billboard around town or the massive 4,200 sq ft signature guitar scoreboard at First Tennessee Park, where Nashville SC plays their home matches.  I also used a D5 for a few of the product shots, but almost everything was the D810.

NSC18 02.10 FTP-8.jpg

The lenses I used were the Nikon 24-70G and Nikon 70-200 VR II, both f/2.8.  I shot tethered to my MacBook Pro and used Adobe Lightroom to capture the images.  Files were put into folders by player name as we shot.  For strobes, I used four self-powered heads, each with a standard reflector.  Settings were usually 1/200, f/8, and ISO no higher than 320.  These settings cut out the ambient light which means the flash duration freezes the action.  The strobes both Mackenzie and I used were all the same brand so using different channels for the two stations worked perfect.

Mackenzie shoots Canon and shot her station with her 70D and a 24-120 f/4 lens using similar camera settings.  She shot on white seamless and used a traditional three light setup.  The two large umbrellas were used to blow out the backdrop while providing rim lighting on the subject, and a beauty dish was used in front.

Battle of the Boulevard

Battle of the Boulevard.jpg

If you're a sports fan living in Nashville, you've certainly heard of and have likely attended the "Battle of the Boulevard" (BOBT) the annual basketball game(s) between Belmont University and Lipscomb University, a rivaliy which dates back over 60 years.  The two programs have played 141 times since the first meeting on December 11, 1953 with Lipscomb leading the series 74-67.  Up until last Monday, Belmont had won the past 11 meetings since 2011, but the Bisons beat the Bruins on the road at the Curb Event Center 74-66, setting up tonight's rematch just over two miles down the road at Lipscomb's Allen Arena in the series which features the closest geographical rivalry in Division I Basketball.

While the two schools play in different conferences (Belmont in the OVC and Lipscomb in the A-SUN), this year the two institutions have expanded the BOTB to all sports and will compete against each other 16 times in the 2017-18 season.

Last season, both games were won on last second shots and were fantastic events to witness as the communities from both schools turn out in full force with crowds in excess of 3,000.

This is truly a great event with two wonderful programs.  If you don't have plans for tonight, come on down to Allen Arena as it will surely be a great evening.  The women start things off at 5:00PM and the men close out the evening at 7:15PM.

BATTLE OF THE BOULEVARD all time series results and records.

Belmont BOTB

Lipscomb BOTB